 Chapter 4—Chain Saw Tasks and Techniques (Suggested time: 2 hours)
Chapter Objectives:
- Students will learn the importance of a thorough
sizeup before limbing, brushing, slashing, bucking,
and felling operations.
- Students will understand the skills needed to operate
a chain saw safely and efficiently.
- Students will understand the types of binds.
- Students will learn the procedures for limbing, bucking, and felling.
Limbing
Any of the following situations could result in a fatality or serious injury.
Check for overhead hazards before any limbing begins. If a specific portion of the tree you are limbing has any overhead hazards, leave that portion of the tree unlimbed.
Check for objects on the ground such as stumps, logs, and spring poles that may be hidden by the limbs of the felled tree. If the tip of the bar unintentionally strikes an object, the saw may kick back.
Maintain a firm grip on the saw with your thumb wrapped around the handlebar during all limbing activities, regardless of the direction the saw is turned.
Be sure you have firm footing as you walk down the tree that you are limbing. Calked boots are strongly recommended for walking on felled trees.
Do not attempt to cut limbs that are supporting a tree off the ground if there's a chance the tree could roll on the sawyer. Always plan and clear an escape route.
When limbing on top of a log, right-handed sawyers should limb the right side out to the top before turning around and limbing the other side on their way back. Another option is to limb a tree out in sections. It is not advisable for a right-handed sawyer to limb on the left side (or for a left-handed sawyer to limb on the right side). Crossing over when limbing could result in an injury.
- The bar length should be appropriate for the sawyer's
height. Proper bar length reduces bending at the waist,
decreasing back strain.
- To increase the distance between the saw chain and your leg, bend at the waist and reach out with the saw to cut the limb. This increased distance allows you more reaction time if a kickback occurs.
Overreaching kickbacks occur when too much bar is used when cutting a limb and the bar tip contacts an object, propelling the bar up and back (figure 4-1).
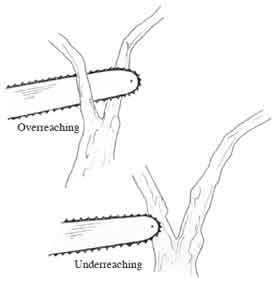
Figure 4-1—Avoid overreaching and underreaching
kickbacks by
using the bar properly.
Underreaching kickbacks occur when too little of the bar tip is used and the tip contacts any object, propelling the bar back and down.
Spring poles are generally small-diameter trees or brush that are pinned under larger trees. Because the small-diameter trees or brush are still rooted, they are under tension when they become pinned. If this tension is undetected, the spring poles can spring back with tremendous force when they are cut, striking the sawyer or throwing the chain saw back into the sawyer. Cut a spring pole only when necessary.
- To remove spring poles properly, begin by relieving
some of the tension in a controlled manner. Stand back
a safe distance and make a series of shallow cuts about ½ inch apart on the underside of the spring pole. Be
careful not to cut too deep. During each cut, as soon as you detect movement, remove the saw and begin
the next cut. Four to six cuts on the underside of the
spring pole should be sufficient.
- The release cut is made from the top, about one-half inch past the end of the series of cuts on the underside and on the piece that is going to fall to the ground. Be sure you are clear of the piece that will be released.
Sometimes a tree is suspended off the ground by the limbs underneath or by uneven terrain. The sawyer must decide whether or not to limb the tree after considering the potential that the sawyer might fall or that the tree might roll or collapse. Consider the choice of footwear and environmental conditions, such as rain, snow, fog, or darkness, and the ability and experience of the sawyer. Carefully select the appropriate technique, such as limbing from the ground, limbing on top, or lowering the tree by bucking (figure 4-2).
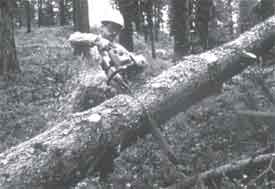
Figure 4-2—The top side of suspended logs should be
limbed while
you are standing on the ground or you can buck
the log to lower it
to the ground before limbing.
Brushing and Slashing
Sizeup and Safety Considerations
Engage the chain brake when moving short distances and be sure the chain has stopped before moving to the next tree. Many sawyers have cut their chaps or their legs because the chain was moving when they took a step toward the next tree.
Shut the saw off when moving farther than from tree to tree, when hazardous conditions exist (slippery surfaces or heavy underbrush), and whenever moving more than 50 feet.
When slashing (felling) trees smaller than 5 inches in diameter, an undercut may not be needed. Instead, a single horizontal cut (kerf face) one-third the diameter of the tree may be used. When directional felling is necessary, use a normal face cut (consisting of a horizontal and sloping cut or two sloping cuts). Situations when directional felling should be used include:
- A potential barber-chair situation
- A closed canopy
- Tree defects
- Side binds
- Anticipated environmental damage
Other Mitigating Circumstances—Always escape the stump quickly, even when felling small-diameter trees. They can cause serious injuries and fatalities.
Trees should be pushed over only by the sawyer, only when the sawyer can do so safely, and only after the sawyer has looked up for overhead debris that could become dislodged.
Safe and Efficient Brushing and Slashing Techniques
In dense fuel accumulations, the tip of the guide bar may accidentally bump (stub) a limb. The sawyer must be alert continually for kickback.
Normally, the sawyer will have a hand piler working nearby helping to remove cut debris. The piler's safety must be taken into consideration.
Proper stance and saw handling is imperative. In addition, the following steps should be taken.
- LOOK UP for widow makers and other loose debris.
Don't cut under a hazard. Remove the hazard or move
the cutting location.
- When possible, stay on top of logs while limbing. Doing
so reduces the chance that the log will roll over on the
sawyer if the sawyer cuts a supporting limb.
- Watch out for whipping limbs and branches when
cutting smaller material. Cut close to the stem. Begin
and complete cuts with a sharp chain and high chain
speed. Use eye protection.
- Cut limbs and stems flush with the trunk or close to
the ground. Do not leave pointed stems that could
cause injury during a fall or cause the sawyer to trip.
- Keep some distance between your legs and the guide
bar. Bend down to maintain distance. Cut on one side,
then the other to avoid moving the guide bar in front
of you.
- Never cut with the chain saw above shoulder height
(figure 4-3). Control is difficult when the saw's weight
is above your shoulders. In addition, a thrown chain
could strike you in the face or upper body.
- Clear debris from the cutting location to prevent the
tip of the guide bar from stubbing it accidentally. When
you are removing debris, engage the chain brake or
turn off the ignition.
- Watch out for spring poles. Do not cut spring poles if you can avoid doing so. If you must cut a spring pole, make your release cut in the top side of the portion of the spring pole that will fall to the ground. Be careful not to stand in the path of the pole when tension is released.
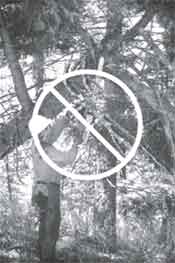
Figure 4-3—DO NOT cut with the chain saw
above shoulder height. Keep the chain saw
below your shoulders to maintain control when
cutting.
- When cutting a heavy limb, consider using a small cut
opposite the final cut to prevent the material from
slabbing or peeling off.
- Pay special attention if you are working in close quarters with other workers in an area with steep slopes and thick brush or logging slash. First, stop and size up the situation. Make a plan and talk it over with all workers in the area. A well thought-out plan saves time and reduces the risk of accidents. After you've discussed the plan, work systematically from the outside in and from downhill up. This reduces the chance that material will hang up. Maintain a space between workers that is at least two-and-one-half times the height of the tallest tree.
You need one or more escape routes, even when slashing (felling) small trees. Begin to develop a pattern as you work into the area. As you down more material, be increasingly careful of your footing and continually identify new escape routes.
Special hazards like leaners and snags need to be taken care of right away. Get hazard trees on the ground so no one has to work under them (figure 4-4).
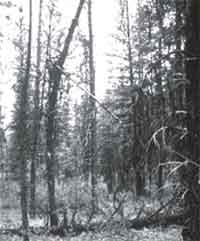
Figure 4-4—Hazard trees, such as leaners, need
to be removed to
prevent anyone from working under them.
Double stumps (figure 4-5) are hazardous because they have a high potential for causing kickback. Watch that bar tip!
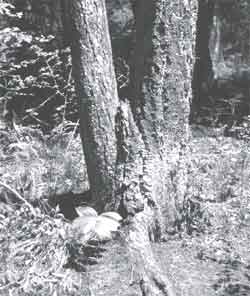
Figure 4-5—Double stumps have a high potential
to cause kickback.
When slashing (felling) small trees, cut the stumps as close to the ground as possible without hitting the dirt with your chain. Stumps are cut low so they will not be as noticeable and will present fewer hazards for people and wildlife.
Small trees can be limbed while they are standing. Don't cut with the chain saw above shoulder height. Limbing the bottom of small trees allows the sawyer to move in closer to the bole when felling trees and will help the sawyer watch the tip of the bar to prevent kickbacks.
The chain is more likely to be thrown when you are working with small material. Check your chain tension often. Sawing close to the ground increases the chances of kickback and damage to the chain. Watch out for rocks and other debris.
Remember, when you saw up from the bottom (using the top of the bar) the saw will push back rather than pull away. This increases the risk of kickback and loss of control. Be aware of signs of fatigue like more frequent kickbacks, bar pinches, and near misses. Take a break when you show signs of fatigue.
Cut pieces small enough so they are easy to lift and handle. Lift properly using the legs and keeping the back straight. Hand pilers must be aware of their footing and watch out for flying debris.
Bucking
Situational Awareness
- Never buck a tree that exceeds your ability.
- Consider overhead hazards.
- Is the guide bar long enough for the tree that is being
bucked?
- Establish good footing.
- Swamp out bucking areas and escape routes.
- Anticipate what will happen when the log is cut.
- Plan the bucking cut carefully after considering:
- Slope. People and property in the cutting
zone can be in the path of rolling logs.
- Tension. Spring poles are trees under
tension.
- Compression. Falling or rolling root wads
are unpredictable when compression is released.
- Rocks and foreign objects under the log. The log will have a tendency to roll, slide, or bind. Broken off limbs hidden underneath the log can roll up and strike the sawyer.
- Slope. People and property in the cutting
zone can be in the path of rolling logs.
The Forest Service Health and Safety Code Handbook emphasizes the following points:
- Assess the area for overhead hazards before beginning
bucking.
- Size up the log for possible reaction after the release
cut has been completed.
- Establish escape routes and clear any obstacles that
might inhibit your escape.
- Cut slowly and observe the kerf for movement that will indicate the location of a bind. A log can have different types of binds at different places.
Safe and Efficient Bucking Techniques
In most situations it is safest to buck logs from the uphill side unless the log may move uphill when it is bucked. This could occur because of the log's position, weight distribution, and pivot points. Always consider binds and pivot points. Consult another sawyer if you have questions.
Learn to use the saw's bumper spikes (dogs) as a pivot point when you are felling or bucking. This technique will enhance your control of the saw and improve the saw's efficiency, while reducing fatigue.
Begin bucking by cutting the offside first. This is the side the log might move to when it is cut, normally the downhill side. Cut straight down until you have space for a wedge.
- Always protect the saw chain from becoming dull.
This will reduce fatigue and lessen chances of kickbacks
and barber chairs. (Barber chairs will be addressed
later.)
- Keep the chain out of the dirt and rocks.
- When cutting uprooted trees with dirt and rocks in the bark, use an ax to trim the bark away from the area to be cut.
Insert a wedge or wedges to prevent the cut (kerf) from closing tightly and pinching the bar.
Understanding directional pressures—or binds—is important for safe and efficient cutting. These binds determine bucking techniques and procedures. Look for landforms, stumps, blowdown, and other obstacles that prevent a log from lying flat, causing binds. When a bind occurs, different pressure areas result (figure 4-6). The tension area is the portion of the log where the wood fibers are being stretched apart. In this portion of the log, the chain saw's cut (kerf) opens as the cut is made.
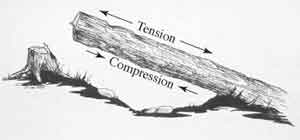
Figure 4-6—The log is being pulled apart by tension force
and pushed
together by compression force. Areas of tension
and compression
occur on opposite sides of the log.
The other pressure area is called the compression area. Here the wood fibers push together. In this portion of the log, the kerf closes as the cut is made. It is extremely important to determine what will happen to the log when it is cut. Inspect the log for all binds, pivot points, and natural skids. Various bucking techniques can be used to lower a suspended tree to the ground.
Determining Bind—The four types of bind are: top, bottom, side, and end. Normally, logs have a combination of two or more binds (figure 4-7).
Top bind—The tension area is on the bottom of the log. The compression area is on the top.
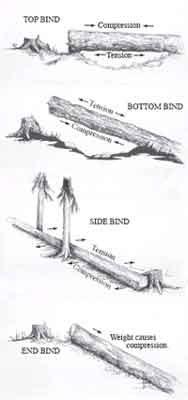
Figure 4-7–There are four types of binds. A log can
have a combination
of two or more binds.
Bottom bind—The tension area is on the top of the
log. The compression area is on the bottom.
Side bind—Pressure is exerted sideways on the log.
End bind—Weight compresses the log's entire cross
section.
It is best to start bucking at the small end of the log and work toward the butt end, removing the binds in the smaller material first. Look for broken limbs and tops above the working area. Never stand under an overhead hazard while bucking.
Look for small trees and limbs (spring poles) bent under the log being bucked. They may spring up as the log rolls away. If you can safely do so, cut these hazards before the log is bucked (figure 4-8). Otherwise, move to a new cutting location and flag the hazard.
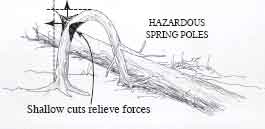
Figure 4-8—Look out for spring poles (trees or limbs
that are being
held down by other trees.) Spring poles can
release with great force,
causing serious injuries. Make a series of
shallow cuts on the inside
of the bend when severing a spring pole.
Determine the offside. It is the side the log might move to when it is cut—normally the downhill side (figure 4-9). Watch out for possible pivots. Clear the work area and escape paths. Allow more than 8 feet of room to escape when the final cut is made. Establish solid footing and remove debris that may hinder your escape.
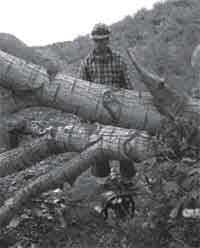
Figure 4–9—Determine the offside. It is the side
the log might move
to when it is cut.
Determine the cutting sequence before beginning to cut (figure 4-10). Cut the offside first from a safe position. If possible, make a cut about one-third the diameter of log. This allows the sawyer to step back from the log on the final cut. Do not let the tip of the bar hit any object.
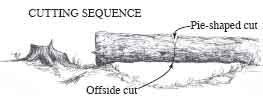
Figure 4-10—Determine the cutting sequence before
beginning to cut.
Watch the kerf to detect log movement. Position yourself so you can detect a slight opening or closing of the kerf: there is no better indicator of the log's reaction on the release cut. If the bind cannot be determined, proceed with caution. It may be necessary to move the saw back and forth slowly in the kerf (about 3 seconds for each chain revolution) to prevent the saw from getting bound as the kerf closes behind the guide bar. Cut only deep enough to place a wedge. Continue cutting. Watch the kerf (figure 4-11). If the kerf starts to open, there is a bottom bind; if the kerf starts to close, there is a top bind.
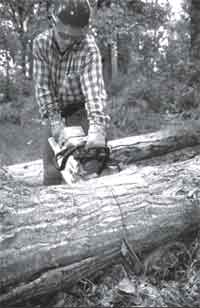
Figure 4-11—Watch the kerf for movement that will
indicate a bottom
bind (kerf opens) or top bind (kerf closes).
Visually project the kerf's location to the bottom of the log. Reduce the amount of wood for the final cut by cutting a short distance into the log along this line. Be prepared for kickback.
The sequence of the remaining cuts depends on the type of bind. Generally the next cut will be a small (less than 1½ inches) pie-shaped cut removed from the compression area. The log can settle slowly into this space, preventing dangerous slabbing and splintering. This practice is extremely important when cutting large logs.
The final cut, or release cut, will be made through the tension area. Because the offside has been cut, the sawyer only has to use enough bar to finish cutting the remaining wood. This allows the sawyer to stand back, away from the danger. The location of the pie-shaped section and the release cut vary depending on the type of bind.
Top Bind: Remove the pie-shaped section from the top and make the release cut from the bottom.
Bottom Bind: Remove the pie-shaped section from the bottom and make the release cut from the top.
Side Bind: If you are not certain the job is safe, do not make the cut. Normally, the offside is the side with tension; the tension side is usually bowed out (convex). Look for solid trees with no overhead hazards or other objects that you can stand behind for protection while cutting. Remove a pie-shaped section from the compression area, and then make the release cut in the tension area.
End Bind: Cut from the top down, inserting a wedge as soon as possible. Finish by cutting down from the top. Watch the wood chips to make sure that the chain is not cutting in the dirt (look for dark chips).
Safe Bucking Practices
Buck small sections that will be easy to control when they begin moving. Removing a single section of log may require that other binds be eliminated first. Angled bucking cuts, wide on top and made on the offside, allow a single section of log to be rolled away from the remaining log.
All logs must be completely severed when bucked. Flagging should be used to mark an incompletely bucked log as a hazard.
Pay special attention when bucking in blowdown. Blowdown is a result of strong winds that have uprooted the trees. At any time while the bucking cuts are made, the roots can drop back into place or roll. Consider the following points when bucking blowdown:
- Small trees growing on the roots of blowdown could
be forced into the sawyer's position if the roots drop
or roll. Cut the small trees first. Limbs may be preventing
the roots from rolling. Don't cut those limbs.
- The roots can move in any direction. Avoid standing directly behind or downhill from them.
Warn workers who are working in or below an active cutting area. Allow workers time to move to a safe location. Verify their safety visually and verbally. Announce when a bucking operation has been completed.
Never approach a cutting operation from below until the saw has stopped running, you have established communication with the sawyer, and the sawyer has granted permission to proceed.
A 30-inch d.b.h. fir tree was lying across a steep slope; the butt end was still anchored by a few roots. About 30 feet from the roots, the tree was balanced on a small stump. This stump supported the small end of the tree above some log chunks and debris.
The first step in proper bucking procedure is to inspect the log for all binds, pivot points, and skids. The sawyer failed to properly estimate the log's reaction when the log was cut. He chose downhill as his offside, expecting both the tree and roots to roll down the slope. He stood 12 feet from the roots and to the left of his saw.
When the sawyer made his release cut, the log rolled slightly uphill, off the small stump. The tree's top came to rest on the log chunks and debris, and then slid rapidly downhill on these natural skids. With the stump as a pivot, the butt end swung uphill, killing the sawyer.
If the small log had been inspected thoroughly, the sawyer could have:
- Bucked the tree at or near the pivot.
- Started bucking at the small end of the tree first,
leaving the roots for last.
- Stood to the right of his saw, so he would be in the clear.
Points to Remember—
- Do a complete sizeup. Identify the hazards, and establish
your escape routes and safety zones.
- Use objects such as rocks, stumps (if they are tall
enough), and sound, standing trees with no overhead
hazards for protection in the event the tree springs
sideways toward the sawyer when the release cut is
made.
- Binds change with log movement; reevaluate as necessary.
- When possible, remove compression before tension.
Basic Felling
Situational Awareness
Analyze the felling job by considering:
- Species (live or dead)
- Size and length
- Soundness or defects
- Twin tops
- Widow makers and hangups
- Spike top
- Rusty (discolored) knots
- Punky (swollen and sunken) knots
- Frozen wood
- Footing
- Heavy snow loading
- Bark soundness
- Direction of lean
- Degree of lean (slight or great)
- Head lean or side lean
- Nesting or feeding holes
- Splits and frost cracks
- Deformities, such as those caused by mistletoe
- Heavy branches or uneven weight distribution
- Damage by lightning or fire
Check the base of the tree for:
- Thud (hollow) sound when struck
- Conks and mushrooms
- Shelf or bracket fungi
- Wounds or scars
- Split trunk
- Insect activity
- Feeding holes
- Bark soundness
- Resin flow on bark
- Unstable root system or root protrusions
Examine surrounding terrain for:
- Steepness
- Irregularities in the ground
- Draws and ridges
- Rocks
- Stumps
- Loose logs
- Ground debris that can fly or kick up at the sawyer
Examine the immediate work area for:
- People, roads, or vehicles
- Powerlines
- Hangups and widow makers
- Snags
- Fire-weakened trees
- Reserve trees
- Structures
- Openings to fall trees into
- Other trees that may be affected
- Hazards such as trees, rocks, brush, or low-hanging limbs
- Other trees that may have to be felled first
Sizeup
Before starting the saw, the chain saw operator must be able to evaluate if a tree is safe to cut. Other options are always available. If felling a particular tree is dangerous, don't do it!
Walk out and thoroughly check the intended lay or bed where the tree is supposed to fall. Look for dead treetops, snags, and widow makers that may cause kickbacks, allow the tree to roll, or result in another tree or limb becoming a hazard.
The escape route and alternate routes must be predetermined paths where the sawyer can escape once the tree is committed to fall or has been bucked. Sawyers must select and prepare the work area and clear escape routes and alternate routes before starting the first cut. Escape routes and safe zones should be 90 to 135 degrees from the direction of fall. Safe zones should be no less than 20 feet from the stump, preferably behind another tree that is sound and large enough to provide protection.
Observe the Top—When you approach the tree to be felled, observe the top. Debris falling from above causes most accidents. Check for all overhead hazards that may come down during felling.
Look at the limbs. Are they heavy enough on one side to affect the desired felling direction? Do the limbs have heavy accumulations of ice and snow?
Are the limbs entangled with the limbs of other trees? If so, they will snap off or prevent the tree from falling after it has been cut.
Is the wind blowing strong enough to affect the tree's fall? Windspeeds higher than 15 miles per hour may require that felling be stopped. Strong winds also could blow over other trees and snags in the area. Shifting or erratic winds require special safety considerations.
Check For Snags—Check all snags in the immediate area for soundness. A gust of wind may cause snags to fall at any time, as may the vibration of a tree fall. If it is safe to do so, begin by removing any snag in the cutting area that poses a threat.
Swamp Out the Base—Clear small trees, brush, and debris from the base of the tree. Remove all material that could cause you to trip or lose your balance. Also remove material that will interfere with the saw, wedges, and ax. Look for small trees and brush that could accidentally stub the guide bar. Be careful not to fatigue yourself with unnecessary swamping. Remove only what is needed to work safely around the base of the tree.
Assess the Tree's Lean and the Soundness of the Holding Wood—Most trees have two natural leans; the predominant head lean and the secondary side lean. The leaning weight of the tree will be a combination of these two leans. Both must be considered when determining the desired felling direction.
The desired felling direction usually can be chosen within 45 degrees of the combined lean, provided there is enough sound holding (hinge) wood to work with, especially in the corners of the undercut.
Evaluate the tree's lean. Using a weight as a plumb bob or an ax, project a vertical line up from the center of the tree's butt and determine if the tree's top lies to the right or left of the projected line (figure 4-12).
Figure 4-12—Assess the tree for
head lean and
side lean.
A pistol-grip tree may appear to be leaning in one direction while most of the weight is actually leaning in another direction (figure 4-13). Look at the treetop from at least two different spots at right angles to each other.
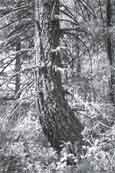
Figure 4-13—The lean of a pistol-grip tree is
hard to determine.
The importance of the holding wood cannot be overemphasized. Determine the condition of the holding wood by sounding it with an ax. Look up for falling debris while doing so.
Boring is an important technique. The color of the sawdust and the ease with which the saw enters the wood will be your indications of the tree's soundness. Boring must be done properly because it has the potential for kickback. Using the guide bar's tip, bore vertically at 90 degrees to the holding wood (figure 4-14). Begin the boring cut with the chain saw lower than the tip of the bar. After the tip is deep enough in the tree to prevent it from kicking back, apply full throttle. Your thumb should be wrapped securely around the top of the handlebar. Maintain full throttle throughout the boring cut.
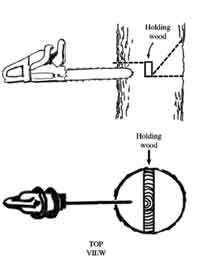
Figure 4-14—Do not weaken the holding wood
by boring into or
across any of the holding wood.
Check for frost cracks or other weak areas in the holding wood. The desired felling direction can be adjusted to eliminate weaknesses in the holding wood. The depth of the undercut also can be adjusted (less than one-third the tree's diameter or greater than one-third) so that the holding area takes advantage of the soundest wood available.
Escape Routes and Safety Zones
With the desired felling direction in mind, determine your escape routes and safety zones (figure 4-15). Consider the side of the tree where you will make your final cut. Don't choose a path directly behind the tree. Escape routes and safety zones should be 90 to 135 degrees from the direction of fall. It is best to prepare two escape routes in case you switch your location on the final cut.
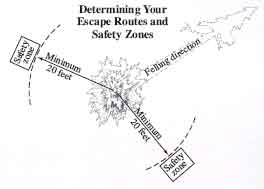
Figure 4-15—Keep the felling direction in mind
when planning
escape routes.
Look for a large solid tree or rock for protection. Safety zones must be at least 20 feet away from the stump and not be directly behind it. Make sure that debris that could trip you is cleared from the escape routes. Practice the escape.
Walk out the intended lay of the tree (figure 4-16). Look for any obstacles that could cause the tree to kick back over the stump or cause the butt to jump or pivot as the tree hits the ground. Look for any small trees or snags that could be thrown into your escape routes. Check to be sure the cutting area is clear of people.
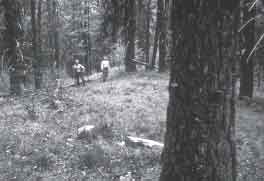
Figure 4-16—Check the intended lay of the tree for obstacles.
Using the observations you made walking out the lay, reexamine the escape routes. Be sure that your chosen routes will be the safest escapes—before you begin to cut.
Beginning the Cut
Assume a comfortable stance for sawing, either standing upright or on one knee. If there is any danger from above, such as snags, the cutting should be done while standing so the sawyer can watch the top and escape more quickly.
The undercut (or face cut) is made in the direction you want the tree to fall. Estimate one-third of the tree's diameter, set the saw's bumper spikes to cut that far, shout a warning if necessary, and proceed with the undercut. When finished, check the direction the tree is faced (figure 4-17). If the face is not in the desired felling direction, correct the cut.
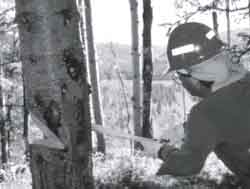
Figure 4-17—Check the direction the tree is faced.
Reexamine your primary and secondary escape routes before beginning the back cut. Shut off the saw and make sure that the cutting area is secure. Shout a warning (figure 4-18).
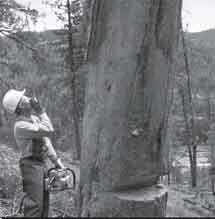
Figure 4–18—Shout a warning to make sure the
cutting area is
secure.
Remember the importance of holding wood, stump shot (see glossary), and wedging, then complete the back cut (figure 4-19).
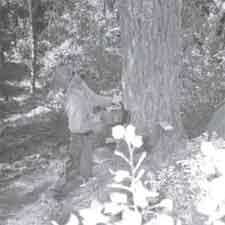
Figure 4–19—Complete the back cut.
Escape. When the tree commits to the fall, leave rapidly, following your escape route. Do not hesitate at the stump. If your saw becomes stuck, leave it. If carrying the saw prevents you from escaping quickly enough, drop it!
Keep your eyes on your predetermined escape route. If the felled tree strikes other trees, they may still be moving after the tree has fallen. Watch for flying limbs and tops. Remain in your safety zone until it is safe to approach the stump.
Analyze the operation. The stump gives the best critique of the felling operation (figure 4-20). Before approaching the stump, look in the tops of the surrounding trees for new overhead hazards.
Take a moment or two to look at the stump. Did the tree fall where it was intended? How much holding wood is left on each corner? Is the stump shot sufficient? Were the cuts level? Take time to analyze the felling operation. Check the stump height and look for stump or root pull and dutchman cuts.
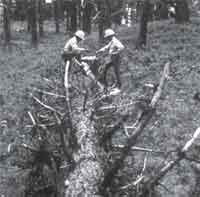
Figure 4–20—Look at the stump when critiquing
a felling operation.
Felling the Tree
Proper evaluation of a felling operation requires a thorough understanding of the mechanics of the undercut, holding wood, back cut, and the felling procedure. In addition, the sawyer needs to consider the various tree problems. Every tree should be evaluated (sized up) using techniques discussed in Situational Awareness in chapter 2.
The Undercut, Holding Wood, and Back Cut—The three basic cuts are the conventional undercut, the Humboldt, and the open face. We are only going to discuss the conventional undercut because of its broad application for all timber types, and because it provides a solid foundation from which to learn additional cutting techniques.
It takes three cuts to fell a tree. Two cuts form the undercut (or face cut) and the third forms the back cut (figure 4-21). The correct relationship of these cuts results in safe and effective tree felling. Before discussing the felling procedure, we will analyze the mechanics of the felling cuts. Undercutting and back cutting construct the hinge that controls the direction and fall of the tree.
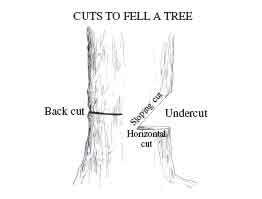
Figure 4–21—A horizontal cut and a sloping cut make
up the undercut.
The back cut is the third cut needed to fell
a tree.
The undercut serves two purposes. First, it allows the tree to fall in the chosen direction by removing the tree's support in the direction of the face. Second, it enables control because the tree slips off the stump, rather than jumping off.
The undercut consists of two cuts, a horizontal cut and a sloping cut. Observe overhead hazards and look up often during the undercut.
The horizontal cut is a level cut. This cut is made close to the ground unless a snag is being felled or another factor creates special hazards for the sawyer. The horizontal cut dictates the direction of fall if the relationships of the three cuts are maintained. After selecting the desired felling direction, estimate one-third the tree's diameter, set the saw's bumper spikes to cut that far, and begin the horizontal cut.
The specific direction of the undercut is determined by "gunning" the saw. Look down the gunning marks on the saw and align them with the desired felling direction. After the cut has been made level to at least one-third of the tree's diameter, the horizontal cut is complete. Trees with heavy leans may not allow the sawyer to make the horizontal cut as deep as one-third of the tree's diameter without pinching the guide bar.
Ideally, the undercut is made in the same direction as the tree's lean, but because of structures, roads, other trees, or trails, the desired felling direction may be to one side or the other of the lean. Normally, the desired direction is less than 45 degrees from the lean.
When the horizontal cut is complete, remove the bark from an area on both sides of the kerf. The bark can be removed with your ax or with the tip of the guide bar (figure 4-22). Watch out in case the ax glances off the bole or the saw kicks back.
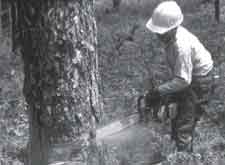
Figure 4–22—Bark can be removed with the tip of the bar.
The sloping cut needs to be angled so that when the face closes the tree is fully committed to the planned direction of fall. As the face closes, the holding wood breaks. If this happens and the tree is still standing straight, the tree could fall away from the desired direction.
As a general rule, make the sloping cut at a 45-degree angle (figure 4-23). Remember that it is important that the face not close until the tree is fully committed to the planned direction of fall.
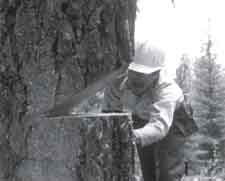
Figure 4–23—The sloping cut is a 45-degree angle.
Line up the sloping cut with the horizontal cut so that they meet, but do not cross. When the cuts cross, a dutchman (figure 4-24) is formed. If the tree were felled with a dutchman, first the dutchman would close, then the tree would split vertically (barber chair), or the holding wood would break off. Felling control would be lost. A weak tree might snap off somewhere along the bole or at the top. It is difficult to make the sloping cut and the horizontal cut meet correctly on the opposite side of the tree. This is because the point of intersection is not immediately visible to the sawyer.
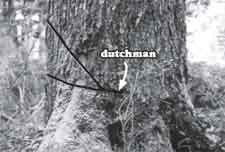
Figure 4–24—When the sloping cut and the horizontal
cut do not
meet exactly, a dutchman is formed. This kerf-wide cut
makes the
direction of the tree's fall harder to predict. It can also cause
the
tree to barber chair, lifting the log off the stump and placing
the
sawyer at great risk.
After making a short sloping cut, leave the saw in the cut. Go around to the other side of the tree and see if the guide bar is in the correct plane to intersect the back of the horizontal cut. Keep your finger away from the throttle trigger while engaging the chain brake.
Practicing on high stumps will help you become skilled at lining up these cuts.
The holding wood is the wood immediately behind the undercut. The most important portion of the holding wood is in the very corners of the cut, in the first 4 to 8 inches inside the bark. The horizontal and sloping cuts must not overlap in this region. If they do, the undercut must be cleaned up so no dutchman is left in these corners. Care must be taken not to cut the undercut too deeply while cleaning up. This will reduce the amount of room available for wedges during the back cut.
If cleaning up the sloping cut will create too deep of an undercut, stop the sloping cut directly above the end of the horizontal cut.
Once the undercut has been cleaned, recheck the felling direction. Place the saw in the undercut and check the gunning marks (figure 4-25) or stick an ax head into the undercut and look down the length of the handle. The back of the undercut should be perpendicular to the desired felling direction.
If the tree is not aimed in the direction that you want it to fall, extend the horizontal and sloping cuts as needed, maintaining a single plane for each of the two cuts.
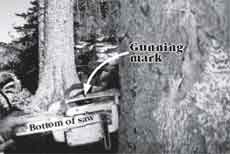
Figure 4–25—Use the gunning marks to check the felling direction.
Back Cut and Wedging Procedures—The third cut needed to fell a tree is the back cut. The back cut can be made from either side of the tree if the saw has a full-wrap handlebar, as recommended in the Health and Safety Code Handbook. Choose the safest side of the tree to make the back cut.
In the area where you have removed the bark behind the horizontal cut, place the bumper spikes so the chain will cut no closer than 2 inches from the face and 2 inches above the face's horizontal cut. You may place the bumper spikes closer than 2 inches on smaller trees with lightweight tops.
The best way to envision these cuts is by the use of a rectangle (figure 4-26). The bottom corner is the back of the face's horizontal cut. The opposite upper corner will be the back of the back cut.
The height of the rectangle is referred to as the stump shot. It is an antikickback device to prevent the tree from kicking back over the stump if it hits another tree during its fall. This is especially important when felling trees through standing timber.
The width of the rectangle is the holding wood. As the back cut is made, the sawyer must be careful not to cut this wood. Maintaining the holding wood is the key to safe and effective felling.
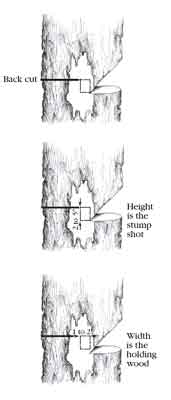
Figure 4–26—An imaginary rectangle can help the sawyer
understand
the importance of the back cut. The dimensions of this
rectangle
are based on a 24-inch-diameter tree.
Start the back cut with the bumper spikes placed so the cut will end in the upper corner of the rectangle. Hold the saw level so that the back cut will be level. You want to be sure that when the cut is finished, it will line up with the top corner of the opposite rectangle. If the cut is angled, wedging power or the stump shot's height will be altered.
It may be helpful to cut or chop the bark to help level the bar. Do not cut deeper than the bark. Cuts into the wood will eliminate or reduce wedging lift. Once the cut has been made into the wood, do not change the cut's location.
Keep at least three wedges and an ax readily accessible while making the back cut. The wedges should be in a wedge holster worn on the waist. Keep the ax within arm's reach. The size of the wedge depends on the tree's diameter.
If there is any wind at all, at least two wedges are recommended. The second wedge adds stability. With only one wedge, the tree can set up a rocking action between the holding wood and the wedge. If a strong wind begins to blow, the holding wood can be torn out.
Remove thick bark immediately above and below the back cut's kerf where the wedges will be placed. The bark will compress, lessening the lifting power of the wedges.
Directional Felling
Place wedges in the kerf as soon as the chain and bar will permit. Place the wedges close together and parallel to the desired felling direction. Do not drive the wedges too hard. They will interfere with the back cut or cause the tree to become a heavy leaner.
Watch for the wedges to droop and occasionally try to push them in with your hands. Retighten them with an ax every 4 to 6 inches of cutting. The wedges are there in case the lean was incorrectly established, the wind causes the tree to set back, or the sawyer intends to fell the tree in a direction that differs from the tree's natural lean.
As you cut, continually look above for possible hazards and at the kerf for movement. Do not cut the holding wood.
The gunning marks can be used in reverse to help determine the guide bar's position. With the correct lean established and the proper relationship between the three cuts, the face will begin to close and the tree will fall in the planned direction.
Wedges must be used for all felling operations. Small trees limit the sawyer's use of wedges, even when small wedges are used.
A technique can be employed where half of the back cut is made at a time. This allows wedges to be placed without interfering with the guide bar.
After making the undercut, cut half of the back cut using the guide bar's tip. Make this cut from the tree's offside. Watch out for kickback and be careful not to cut the holding wood. Finish the back cut from the other side. Leave 1 to 2 inches of holding wood, depending on the diameter of the tree.
After removing the saw, place a small wedge in the kerf an inch or more from the remaining wood to be cut. Remember to keep the wedge tight but do not drive the wedge too hard. Finish the back cut using the tip of the guide bar, being prepared for kickback from the wedge.
The wedge will be in position if the tree sits back. For
trees that have a moderate amount of side lean, two
wedges may be inserted on the side of the back cut that
has been cut first
(figure 4-27). As with other wedging
operations, it is essential to tighten the wedges often,
especially on trees that are attempting to sit back.
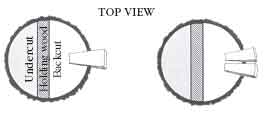
Figure 4–27—Wedges need to be parallel to the desired
felling direction.
A sitback is a tree that settles back opposite the intended direction of fall during the back cut. Normally, this happens because the lean was incorrectly determined or the wind changed. If the sawyer has been following the proper felling procedure, there is a wedge in the back cut and the holding wood has been maintained. If the proper felling procedure has not been followed, the sawyer will need assistance because the tree is probably pinching the bar (figure 4-28).
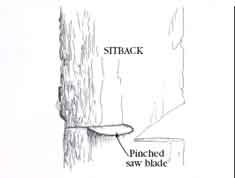
Figure 4–28—Sitback is when a tree settles back
opposite the intended
direction of fall.
Immediately notify your supervisor in the case of sitbacks and other felling difficulties. Before you leave a hazardous tree, be sure to mark the area clearly with flagging (figure 4-29) or with a written warning. Give a verbal warning to others working in the area. The supervisor shall reassess the tree and determine the skill level needed to fell the tree safely.
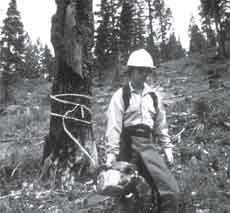
Figure 4–29—Clearly mark a hazard tree before
leaving the area.
Notify your supervisor of the hazard.
Snags also require careful attention to wedging. A snag is a standing dead tree, or portion of a tree, whose wood is decomposing. The steps for cutting a snag follow:
Shout a warning—Before working on a snag, everyone in the area must be notified. Remember, a snag can fall in any direction at any time.
Observe the top—Pay special attention to overhead hazards, branches, and the snag's top. Upper limbs may be weak and ready to come down at the least vibration. Never cut directly below a hazard. Look up while driving wedges.
Swamp out the base—Carefully check the condition of the bark on the snag. Loose bark can come sliding down the side of the snag and presents an extreme hazard to the sawyer. Standing back with room to escape, remove loose bark at the snag's base by prying it with an ax or a pole. Do not chop the bark, because this would set up vibration in the snag.
Size up the situation—Check the condition of wood by boring into it with the bar tip. Maintain the integrity of the holding wood. When sounding with an ax, look up while striking the tree. Check for frost cracks and other splits in the holding wood.
Determine two escape routes—Since the holding wood is rotten to some degree, you must establish two routes of escape.
Make the undercut—Do not fell a snag against its lean. Make the undercut and the back cut while standing upright. When you are standing, you can look up easily. In addition, you are in a position that allows immediate escape.
When you are cutting the undercut, be alert for the snag pinching the bar. Boring in the undercut area during sizeup should alert you to this possibility. Moving the bar back and forth will minimize the possibility of pinching. If the snag starts to sit on the bar, finish the undercut just to that depth. It is critical that the undercut has a wide opening and that it be cleaned out from corner to corner.
A short snag, with few or no limbs to give it lean, may need an undercut up to one-half the snag's diameter.
Felling Observers and Spotters
The use of personnel other than swampers in felling operations has been controversial. The Health and Safety Code Handbook states that if you choose to have additional personnel (such as during training), justification for the additional personnel and the implementation process shall be documented in the JHA.

