
Getting the Hang of It
The length, shape, and mounting of an ax handle (also called a helve or haft) is known as the hang. The hang of an ax is always a matter of personal preference. You must hang your ax to suit you. The cutting edge of a well–hung ax is in an exact line with the end of the handle (Figure 31). If you place the ax on a table so that the cutting edge and the handle touch the surface, the cutting edge will touch at a point one–third from the heel (Figure 32).
![]()
Figure 31—In a correctly hung ax, the
cutting edge is in a direct line
with the
center of the handle (from the Axe Manual of Peter McLaren).

Figure 32—Proper ax–head angle
(drawing by Frederic H. Kock).
In addition to having the blade aligned and set at the correct angle, a properly hung ax just feels right. The head is neither too heavy nor too light, and the handle is just the right length. The handle may be curved or straight, depending on your preference. The handle's diameter should feel comfortable to the grip, and the handle should be constructed from the highest quality hickory. I personally prefer a slim–taper octagonal handle. I get a good grip, or purchase, on the slim handle and it has a bit of flex to it, unlike thicker handles.
Many years ago, before the proliferation of mass–produced axes, most users selected and handled their own axes. Professionals who worked with axes were very particular about the weight, length, design, geometry, flexibility, and most importantly, the hang of their axes. Such attention allowed them to work faster and made the task easier.
Most felling axes and broad axes were not regularly sold with handles until about 1920. The purchaser generally took pride in making and fitting, or hanging, his or her own handle. Many people made patterns of the handle they used on a thin board. Sometimes this pattern was handed down through the family. Some of these patterns still exist and can be found in old barns and workshops.
Throughout history, hickory has always been the preferred wood for percussion tools like axes, mauls, and hammers. In the 18th century, hickory was probably split instead of sawn to obtain a straight and continuous grain essential for a quality tool handle. Surviving handles from the 17th century show that most were straight patterns, without the swell at the end of the handle as is common on both straight and bent handles today (Figure 33, Figure 34a, Figure 34b, and Figure 34c).
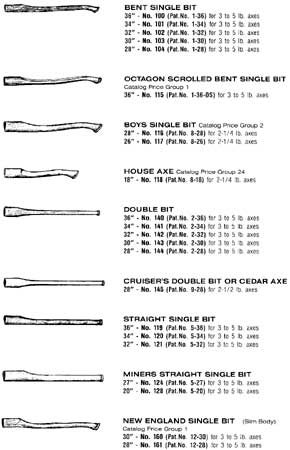
Figure 33—Some ax handles available in
1999 from O.P. Link
Handle Company
(reprinted by permission from O.P.
Link
Handle Company).
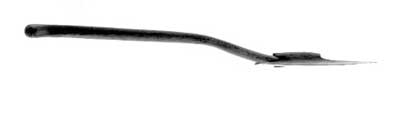
Figure 34a—Modern S–bend broad ax handle.
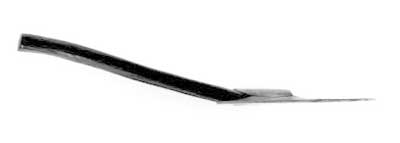
Figure 34b—A 19th–century S–bend broad ax handle.
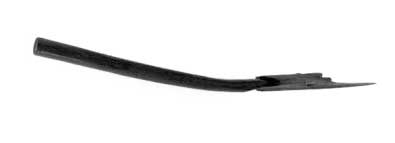
Figure 34c—A 19th–century dogleg broad ax handle.
Today, few ax users hang their own axes. Most professionals in ax competitions hang their own axes, as do some professional woods workers and craftsmen.
Most axes with broken handles are thrown out or relegated to a dusty corner of the garage and replaced with a new ax from the local discount store. Often the ax heads thrown into the corner are of much higher quality (better steel, craftsmanship, temper) than most generic axes sold by mass marketers today.
In my opinion, folks who take any pride in their ax skills need to know how to hang and sharpen an ax. They should know how to make emergency repairs in the field, and they should know how to sharpen and care for their axes to keep them safe and tuned for peak performance. The most important reason for acquiring these skills is one of attitude. By hanging and sharpening your own ax, you realize it is your ax, not just a hunk of wood and metal. And you are more likely to take care of the ax and use it safely.
Basics of Handle SelectionHickory makes the best handles for percussion tools like axes. You seldom see any species other than hickory offered by ax–handle companies.
There are several important characteristics you need to look for in a good ax handle. Generally, you get what you pay for, because the higher grade hickory handles sell at a premium over lower grade handles. Your new handle should be of straight grain, second growth, clear hickory. Cheap, inferior handles tend to break, split, and warp. If you are going through all the work of hanging your own ax, you should spend the extra dollars to get a high–quality handle. Some characteristics you need to look at include:
Color: The best handles are from second growth hickory sapwood, all white in color (Figure 35). In lower grades, various amounts of red–colored heartwood are in the handle.
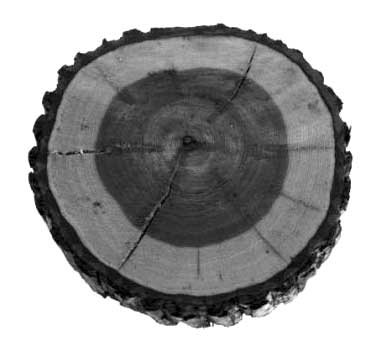
Figure 35—Hickory cross section. The outer,
white sapwood makes
the best ax handles.
This particular piece is too small and
too
riddled with checks to be good handle stock.
Grain: The highest grade does not have over 17 annual rings per inch of radius, a characteristic of faster–growing second growth trees. The orientation of the grain is critically important (Figure 36 and Figure 37). If the handle is not straight–grained, it is likely to break.
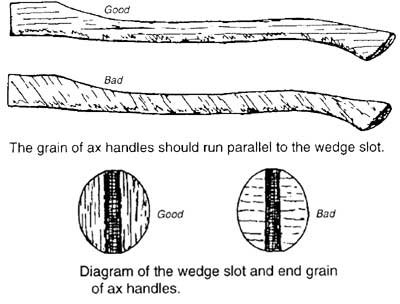
Figure 36—The grain of ax handles should
run parallel to
the length of the handle
and to the wedge slot.
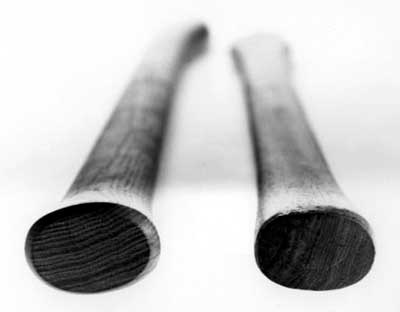
Figure 37—Grain orientation is important.
The handle on the left
has a good orientation.
The one on the right does not, and
is more
likely to break under stress.
Defects: Various defects, including stain, holes, knots, splits, streaks, and grain deviations all diminish the grade of the handle.
Camouflaged Defects: Many less–than–perfect ax handles, often on bargain or utility axes, have defects that are camouflaged. This often helps make the ax look better, but you should recognize that good looks can hide defects. Some common techniques include staining, painting, or fire–finishing, which hardens and darkens the handle's surface.
Handles come in a variety of lengths, typically from 32 to 36 inches for 3– to 6–pound axes (Figure 38). Often the longer lengths work best for big timber and for splitting wood, while the shorter lengths are superior for smaller timber and general utility work. Handles (Figure 39) can be straight or curved (called a fawn's foot). Double–bit handles are almost always straight, but for single–bit axes you can choose either curved or straight handles. My personal preference is a straight handle, usually less than 36 inches long. The handle can be oval or octagonal. I special order O.P. Link handles in a slim–taper, octagonal pattern, a design not found in their general catalog but one the company makes for me from the hundreds of patterns they have on file.
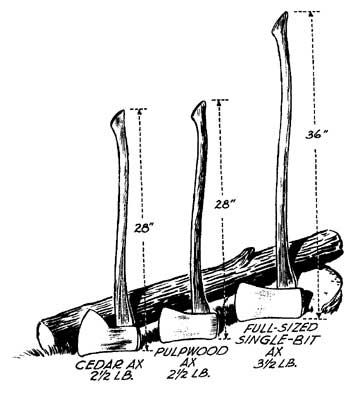
Figure 38—Longer handles with heavier heads
are for big timber. Most choppers prefer
shorter, lighter axes for smaller wood
(drawing by Frederic H. Kock).
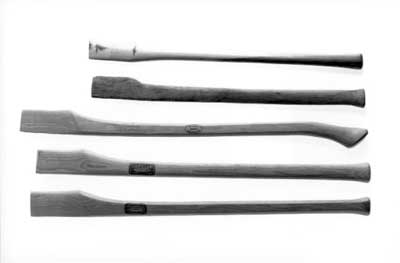
Figure 39—Some ax handles, from top: double–bit
with too much
heartwood;
handmade 19th–century
single–bit; the next three are
new
single–bit
handles from O.P. Link—fawn's foot
octagonal,
straight
oval, and my favorite,
straight octagonal slim–taper.
Most ax manufacturers also offer axes with fiberglass or other plastic composite handles. While these may be durable and sturdy and perhaps adequate for splitting mauls, they do not provide the feel that a hickory handle offers. You also cannot customize a fiberglass handle. They are not traditional, which matters to me. And besides, they are just flat ugly.
Never insert iron, steel, screws, nails, or any other metal object down in the wooden wedge to tighten the handle, even though you see this being done on many factory–handled axes. Epoxy should not be used, either. This advice applies for the entire life of your ax. The metal wedges tend to split the grain on the hickory handle. I can't see any reason why you would want to do that to a properly hung ax.
A loose handle can be temporarily tightened either in the field or in the shop by soaking the head in a bucket of linseed oil. Never soak the handle in water, except for short–term, emergency field tightening. Water will tighten the handle to the head, but the water dries out rapidly, leaving the head looser than before you started. Tightening the handle by soaking it in linseed oil is also a temporary measure. The ax must be rewedged or hung again to keep it tight.
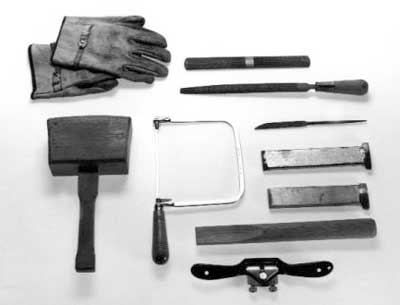
Figure 40—Tools needed for hanging an ax include
(clockwise, from
top left):
leather gloves, four–in–hand
rasp, wood rasp, keyhole rasp,
steel drift
for double–bit
ax, steel drift for single–bit ax, hickory drift
made from
old handle, spokeshave, coping saw, and wooden mallet.
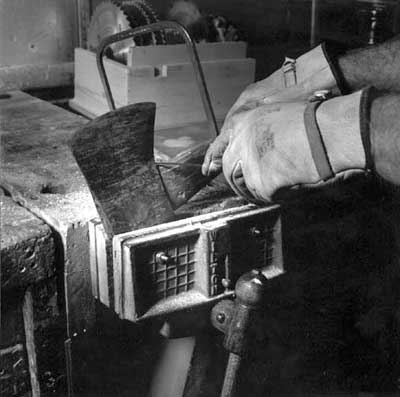
Figure 41—Cut off the old handle just below the ax
eye, close up against
the head, with a coping saw.
Remove any steel wedges or screws
that may be in
the top of the handle at this time.
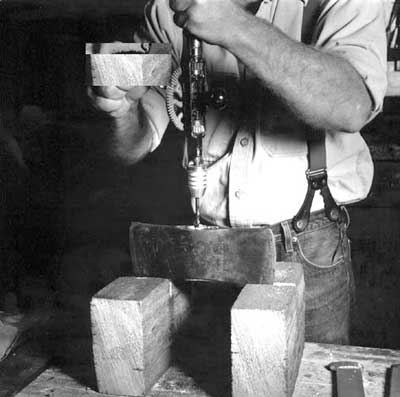
Figure 42—Drill out the wooden wedge and
part of the handle
from the top side of the
ax eye. Power drills work, too.
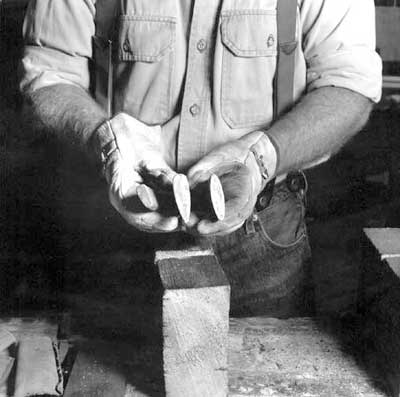
Figure 43—Use a wooden or steel drift or swedge
to drive out the
remainder
of the handle. Notice
the drift in the center is shaped
for a single–bit
ax, the one on the right is for a double–bit ax.
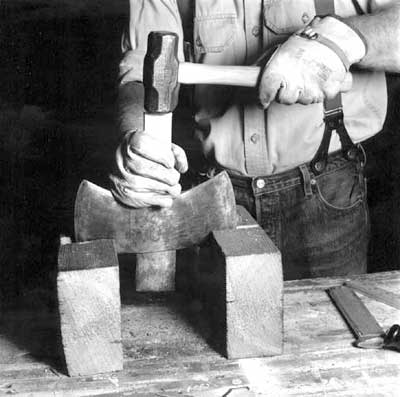
Figure 44—Block up the ax head upside down. Drive
the drift down through
the bottom of the ax eye toward
the top of the ax eye. The ax eye is
tapered
larger on
the top to facilitate wedging the handle tight.
This
taper
requires the old handle piece to be
driven
out the top
of the ax eye.
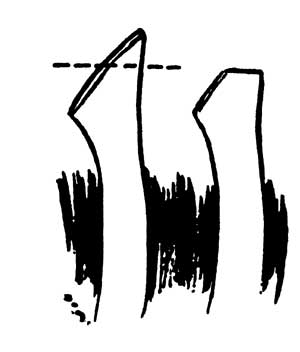
Figure 45—If you use a fawn's foot handle, saw off
the handle about ¾ inch from the butt end to
provide
a blunt surface for pounding with your mallet
(drawing
by Frederic H. Kock).
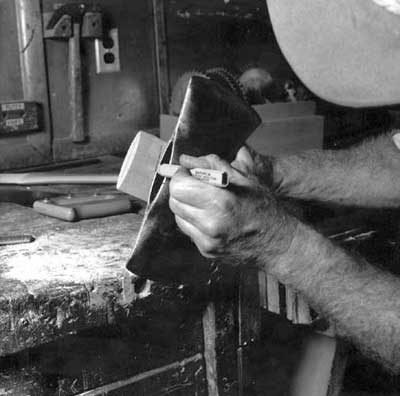
Figure 46—Take the new handle and place it next
to the ax head.
Bring the shoulder of the new
handle all the way up to the bottom
of the ax
eye in its finished mounting location. This
usually leaves
quite a bit of excess wood on
top. Draw a line to show where
the excess wood
should be cut off.
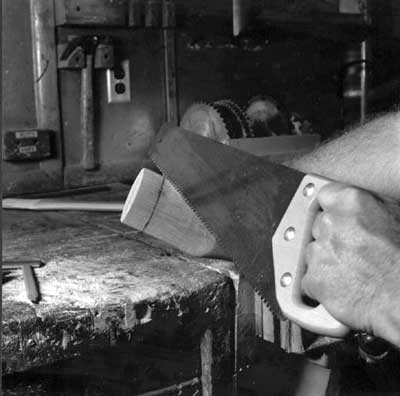
Figure 47—With the handle in the vise, use
a hand saw to cut off the
excess wood. Be
careful not to split the handle.
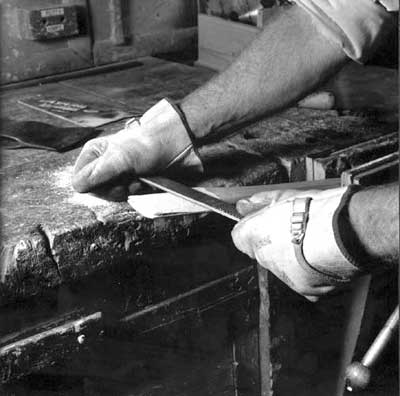
Figure 48—Using an aggressive wood rasp or a four–in–hand,
start
dressing
down
the handle to fit the ax–eye
socket tightly.
At this
point,
be
careful not to
split off the edges of the handle or
to rasp
off
too
much wood. Once it's rasped off, it can't be
put back!
It usually
takes several repetitions of
rasping
and
checking
for
fit to get
everything
just right.
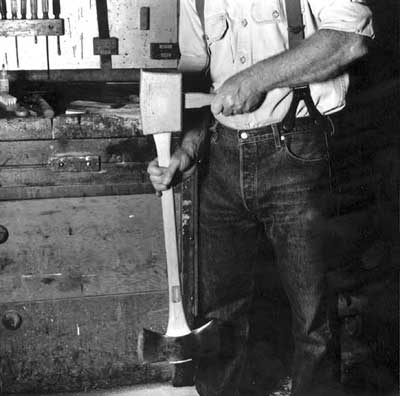
Figure 49—When the ax is properly hung, the
bottom of the ax
eye should
rest on the shoulder
of the handle. Drive the new
handle
into your
ax
head for a trial fit. Place the handle in
the eye socket from
the bottom.
Use a large
wooden mallet
to strike the bottom of the
handle squarely
and firmly. This will
draw
the weight of the ax head up onto the handle.
There's no
need to rest the ax head or the
handle against a solid base.
Sight
down the
cutting edge to see if the ax edge is in exact
line
with
the end of the handle (See Figure 31).
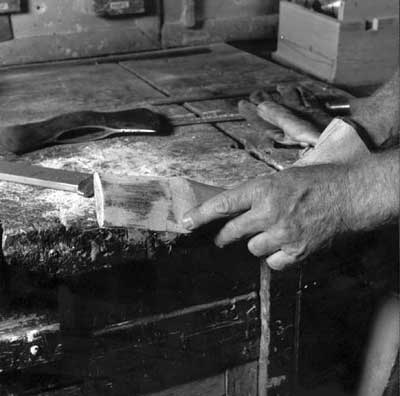
Figure 50—Drive the handle out again using
a drift, and take
one final
rasp for a good tight
fit down
on the shoulder.
The ax head will leave
marks on the
high spots
that need additional light rasping.
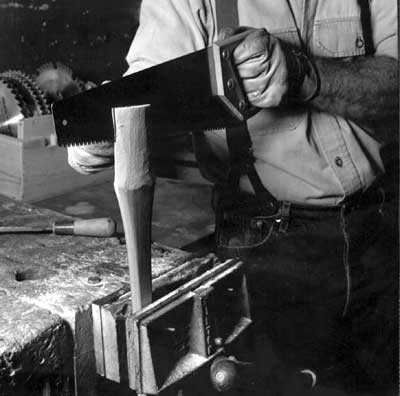
Figure 51—Since you've cut off the excess portion
of the new handle,
the wedge kerf slot is too
shallow and must be deepened. Use a hand
saw to
cut the saw kerf deeper for the wood wedge. The
cut
should be
approximately two–thirds the
depth of the ax eye.
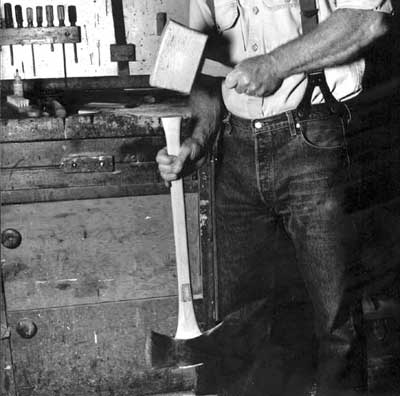
Figure 52—Time for the final fit. Drive the
head on by striking the
bottom
of the handle.
You can often tell when the head
will move
no farther by the solid sound of the strike.
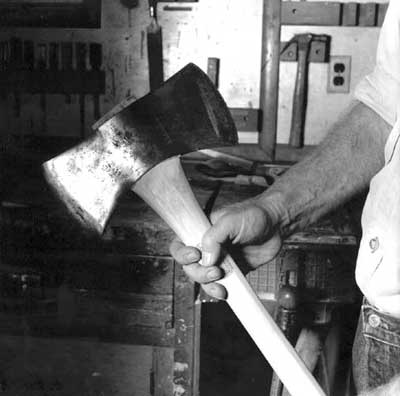
Figure 53—This handle is properly mounted on the
shoulder. Compare
this photo with the untrimmed
handles in Figure 39 to see how low on
the
shoulder
this ax head is mounted. There is no excess
shoulder,
and the handle is ready to be wedged.
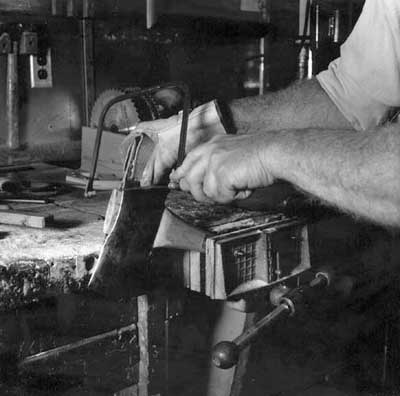
Figure 54—With a coping saw, cut the protruding
handle flush with
the ax head.
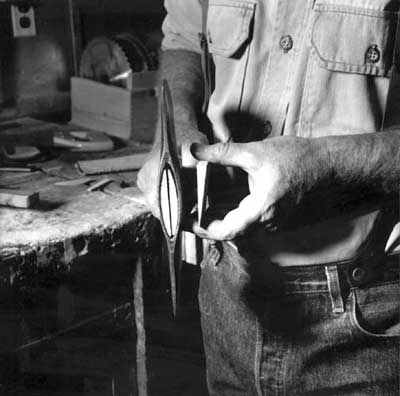
Figure 55—The fitted handle is ready for wedging.
Use a correctly sized
wooden
wedge, usually made
of well–seasoned yellow poplar or
other hardwood.
Avoid plastic or steel wedges.
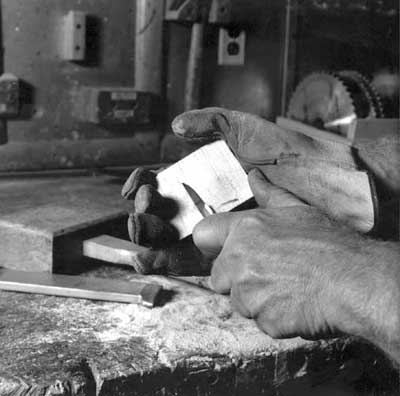
Figure 56—Sometimes the wedge is too thick for the saw
kerf and ax
eye. If so, thin the wedge out a little
bit so that it can be
driven almost full length.
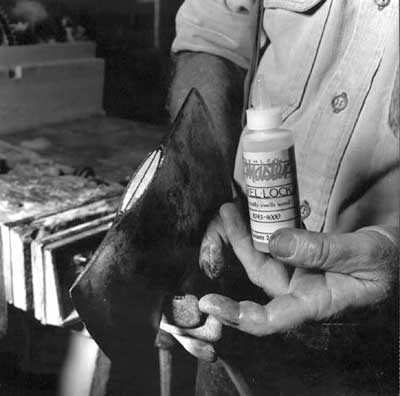
Figure 57—Before inserting the wedge in the handle,
apply a coat of
Swel–Lock
to the inside kerf cut and
the new wooden wedge. Swel–Lock
is a product that swells
wood. It is not a glue or an adhesive; rather,
it penetrates
and expands wood fibers to keep the new handle tight.
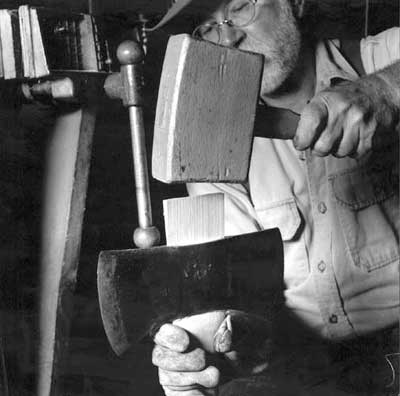
Figure 58—Insert the wooden wedge. Rest the handle
bottom on
something
solid. Drive the wedge squarely and
firmly into the kerf
with a wooden carpenter's mallet.
If you have set everything
up
properly,
there should
only be ¼ to ½ inch of wedge protruding
above
the top
of the handle when the wedge has been driven to the
point
of
refusal. Use a coping saw to cut off any excess wedge.
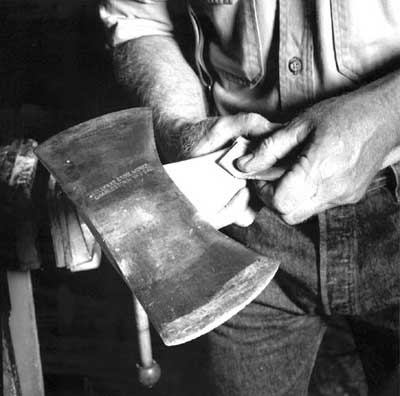
Figure 59—Sand any paint, varnish, shellac, or wax from the handle.
Sand the handle smooth on all but 6 inches of the butt section.
The body of the sanded handle is where your hand will slide.
You don't want any splinters or rough wood there.
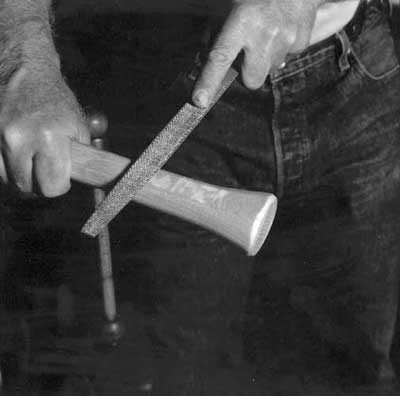
Figure 60—Rough up the lower 6 inches of the butt
section of
the handle
with
a wood rasp. This rough
section will give purchase, or grip, to
your stationary hand
at the bottom of the ax handle.
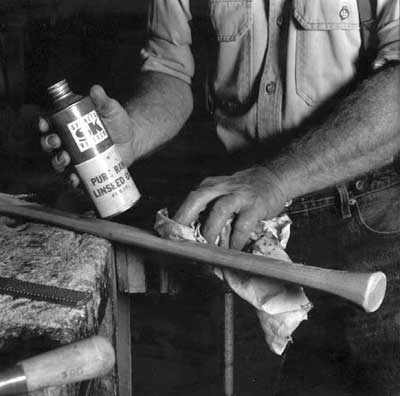
Figure 61—Apply a light coat of raw linseed oil if it is available,
or boiled
linseed oil if it is not. Tung oil will also work. A regular
application of
these oils will protect against drying
and cracking.
Wipe off the excess oil.
Never insert iron, steel, screws, nails, or any other metal object down in the wooden wedge to tighten the handle, even though you see this being done on many factory–handled axes. Epoxy should not be used, either. This advice applies for the entire life of your ax. The metal wedges tend to split the grain on the hickory handle. I can't see any reason why you would want to do that to a properly hung ax.
A loose handle can be temporarily tightened either in the field or in the shop by soaking the head in a bucket of linseed oil. Never soak the handle in water, except for short–term, emergency field tightening. Water will tighten the handle to the head, but the water dries out rapidly, leaving the head looser than before you started. Tightening the handle by soaking it in linseed oil is also a temporary measure. The ax must be rewedged or hung again to keep it tight.
Sharpening"Putting your nose to the grindstone" implies tedious, repetitious, and unending work. You will find that sharpening a dull or abused ax is indeed tedious and repetitious, but to do it right you have to do it slowly (Figure 62). Along the way, you'll learn the value of patience, and appreciate the differences in steel tempering and ax quality as you sharpen different axes. Best of all, you will appreciate the usefulness of a razor–sharp ax, and the importance of doing everything you can to keep it sharp.
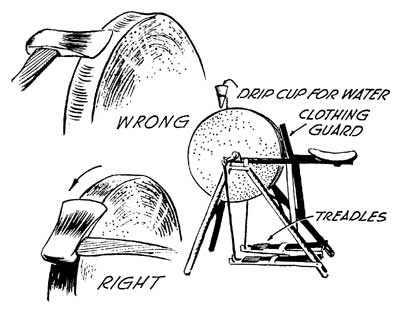
Figure 62–The right way and wrong way to use a
grinding wheel (drawings by Frederic H. Kock).
Never use an electric high–speed dry bench grinder to sharpen your ax. That type of a grinder will almost certainly draw the temper from the ax and ruin it. Very few people have enough skill to use a high–speed grinder without drawing the temper from the steel, leaving the steel too soft to hold an edge. The only grindstone that I recommend is one of the old–style pedal grindstones that stay wet with a constant application of water to the stone. If you draw the temper from your ax with a high–speed grinder, you may have ruined the ax for good. At the minimum, you've drawn the temper for at least 3/16 of an inch back from the edge. You can always tell when the temper is drawn because the color of the steel at the edge turns blue. If this happens to your ax, you've got to remove a lot of steel to reshape the edge back to where it still is tempered. If you use a pedal grindstone, keep it wet, and always rotate the grindstone toward you and into the ax, not away from it.
If you don't have a pedal grindstone, your options are limited to a file and whetstone. This is how most quality ax sharpening is done today. Few stores carry pedal grindstones. Wear leather gloves (Figure 63) throughout the sharpening process, as the ax will become razor–sharp.
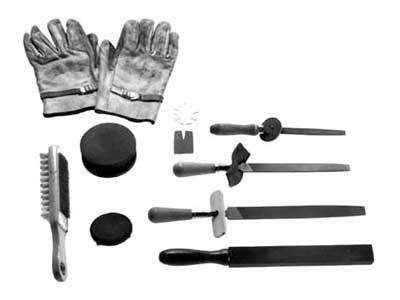
Figure 63 –Tools for sharpening (clockwise from top left) include
leather
gloves; ax–bit width gauges; 8–inch, 10–inch, and 12–inch
mill bastard
files; Carborundum scythe stone; Carbor–undum
ax stone; file card;
and grooved Carborundum sharpening
stone. Natural
Arkansas sharpening stones also work.
Fit your file with a guard to protect your hands (Figure 64). The guards, which keep your fingers away from the sharpened ax blade, can be made from leather, wood, or a piece of fire hose.
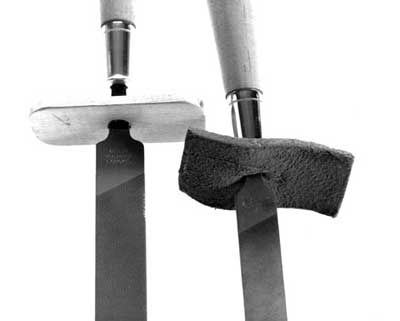
Figure 64—File guards help keep your fingers
away from the sharpened ax blade.
Clamp the ax to the bench at a comfortable height (Figure 65). Put on gloves to protect your hands. Hold the file as shown. Because you file into the edge of the ax, not away from it, you need gloves in case of a minor slip. Always file into the edge, toward the center of the ax handle, because this creates the least amount of burr to remove on the other side. The single–cut file sharpens only on the push stroke. Lift it away from the ax head on the return stroke. If you "saw" with your file, it will fill with metal particles. It will not cut well and it can also be ruined as the file edges are peened over. Occasionally brush the metal particles from the file with a file card. Always store and transport your files so they are protected from each other and other metal tools. Banging them together will dull their edges.
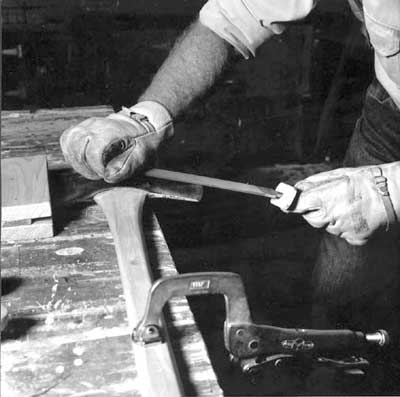
Figure 65—Clamp the ax to the bench at a
comfortable height for sharpening.
When sharpening, always try for a fan–shaped effect on the cheek of the ax (Figure 66). File back for a distance of approximately 2 to 3 inches from the cutting edge right at the middle point of the ax. Work your way from the cheek down to the actual edge, keeping a rounded profile. Stop filing once you have filed one side so that a burr of metal can be felt on the back side. Turn the ax over and repeat the process on the other side of the ax. Continue filing on the opposite side until the burr goes back over to the first side of the ax where you started. Stop at this point.
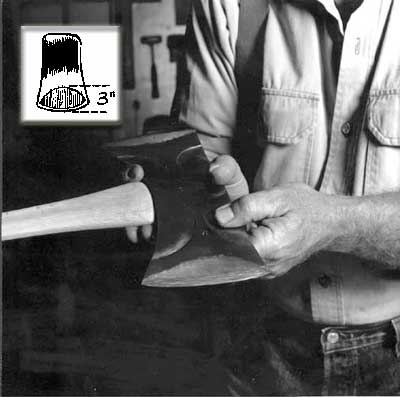
Figure 66—When sharpening, try for a fan–shaped
effect on the cheek
of the
ax (drawing by
Frederic H. Kock).
It is time to check the shape of the edge with a sharpening gauge (Figure 67). This gauge can be handmade from a piece of cardboard, a small piece of brass, or even a piece of wood. See the illustration for the proper shape of your edge. The angle is about 25 degrees, but is slightly convex. The gauge is exactly to scale and can serve as a template (Figure 68).
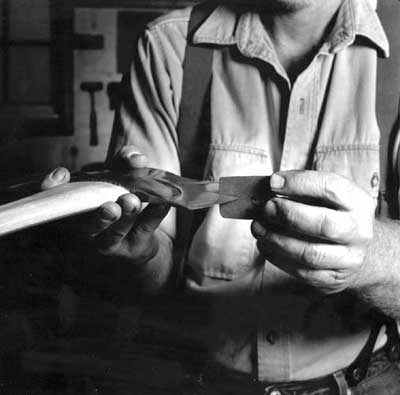
Figure 67—Use a sharpening gauge to check
the shape of the edge.
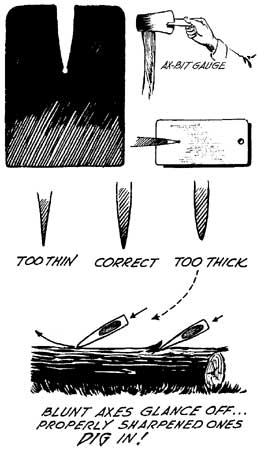
Figure68––A template for a sharpening gauge
(reproduced to exact size) and illustrations
showing its use (drawings by Frederic H. Kock).
Continue to file equally on both sides of the ax until the sharpening gauge pattern fits exactly over the edge. If you are sharpening a double–bit ax, keep one blade slightly thicker for rough work and grubbing near the ground, and the other blade shaped according to the sharpening gauge. Use the properly shaped edge for fast, clean cutting.
Now it is time to hone the edge with a whetstone. The honing process finishes and polishes the edge and removes the burr. Honing should always be done immediately after reshaping with a file. It should also be done in the field during use and every morning before starting the day's ax work. Natural whetstones are quarry stones. My favorites are Arkansas stones, which come in different grades. The Washita is my favorite for fast cutting and the Hard Arkansas is my favorite for finishing. One of the finest finishing oil stones is called a Surgical Black Hard Arkansas. This stone will put a razor edge on your ax. Manmade stones are usually oil stones of Carborundum and come with a coarse and a fine side. Other whetstones are called water stones and use water to float the metal particles out of the stone instead of oil. Always use oil with an oil stone or water with a water stone to float the metal particles away. Wipe the stone clean of these metal particles periodically and apply more oil or water. Water stones are quite a bit softer than oil stones and tend to cup and wear faster. The advantage of the water stone is that it rapidly puts a fine polished edge on your ax.
Round artificial ax stones (Figure 69) are sometimes called pocket stones. I know of two types. The traditional type has both a coarse and a fine side and is about ½ inch thick. This traditional ax stone can be dangerous to use, because your fingertips are always in jeopardy. Another type of ax stone has a finger groove in the center to keep your fingertips out of jeopardy. Both of these round ax stones are of Carborundum and require oil (Figure 70) to float the metal particles off of the stone.
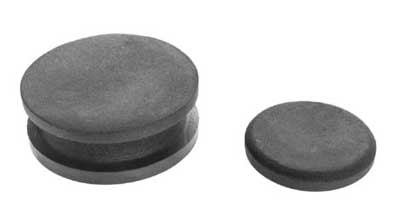
Figure 69—Round ax stones, sometimes
called pocket stones.
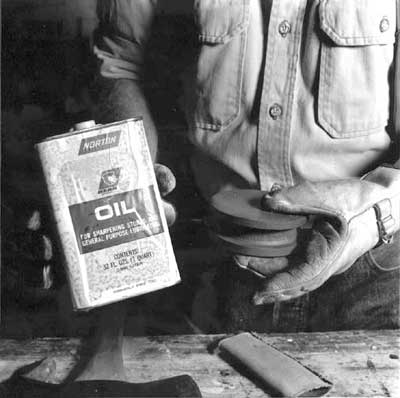
Figure 70—Use oil to float metal particles
off ax
stones made of Carborundum.
Use the ax stone in a circular motion, working into the edge, toward the middle of the ax head (Figure 71). Work one side of the ax with the coarse stone until it creates a metal burr, then flip the ax over and use the coarse stone until it pushes the burr back. Switch to the fine side of the ax stone and repeat the process until there's a very fine burr and both sides of the ax edge have been honed. Honing the edge removes very small particles of metal from the blade and causes the remaining ax metal to burr slightly. This is sometimes known as a wire edge or a feather edge. At this point you may want to move to one of the Arkansas stones like the Hard Arkansas finishing stone and work the burr back and forth until it breaks off or becomes very fine. I recommend stropping the edge by drawing the ax toward the edge (opposite the direction used during sharpening) on a piece of finished leather or a piece of soft, clear wood like pine. This stropping will remove the final burr or wire edge.
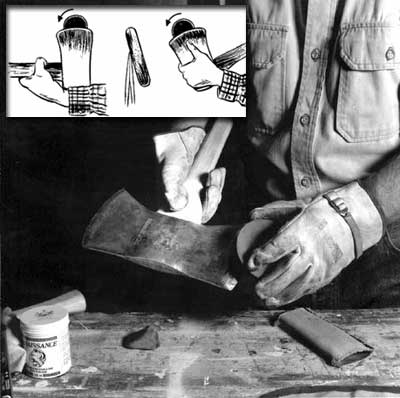
Figure 71—Use the ax stone in a circular motion,
working
into
the
edge,
toward the middle of the
ax head (drawings by Frederic H. Kock).
The last step is to apply a protective coating to the ax head itself (Figure 72). You can clean the rust and pitch from the metal with an abrasive impregnated rubber eraser block called the Wonderbar. Wipe light machine oil over all the metal on both sides of the ax, and then carefully rub a beeswax and oil mixture into the steel. The mixture will cling to the steel and protect it from rust. The ax head should be warm to ensure better coverage of the mixture.
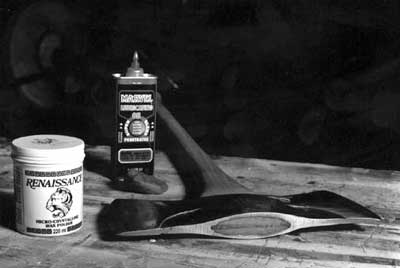
Figure 72—Protective coatings for the ax head.
Always check the ax for sharpness. A honed ax will cut faster, be safer to use, and stay sharp longer. If you look directly into the edge of your ax with the light over your shoulder (either sunlight or artificial light), the edge that you've just honed will reflect no light. If you see any light reflected from the edge, you need to go back and hone the ax with the stone. Occasionally, a ding or a nick in the edge will reflect light just at one point. It is not always necessary to remove these dings as they will disappear through repeated filings. A correctly honed edge is sharp with no wire edge. It reflects no light. If you followed procedures, your edge should be sharp enough to shave with (Figure 73). I sometimes check the sharpness by carefully dry shaving the hair on the back of my hand. This is a traditional method used in the woods for years. A safer and equally effective test is to carefully put your fingernail (not your finger) against the sharpened edge. The edge should bite into your fingernail and not slide down it.
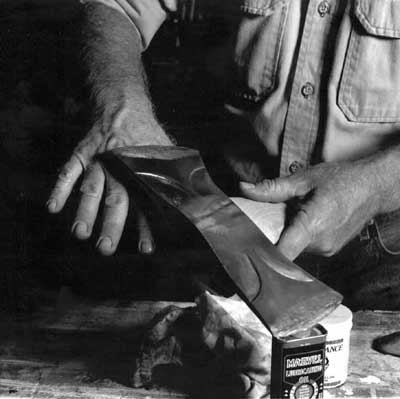
Figure 73—Shaving hair on the back of your hand
is a traditional
method
of
checking an ax's sharpness. A safer method is to place your
fingernail
against the edge. The edge should
bite into your fingernail.