Back | Next | Home
Missoula Technology &
Development Center
|
Table
of Contents Back | Next | Home |
Missoula Technology & Development Center |
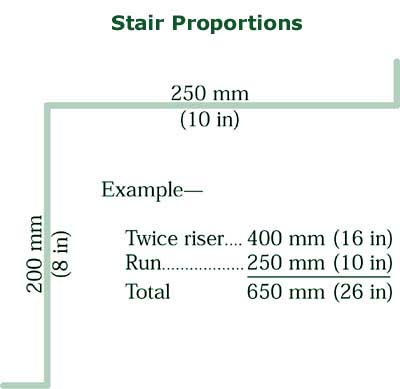
Special Structures (continued)Hikers, especially backpackers, generally don't like steps and will walk alongside them if there is any opportunity. The steps need to be comfortable to climb or they won't be used. This means keeping the rise a reasonable 150 to 200 mm (6 to 8 in) and the run long enough to hold a hiker's entire foot rather than just their toe (Figure 67). It's helpful to armor the sides of steps with rocks to encourage users to stay on the steps.
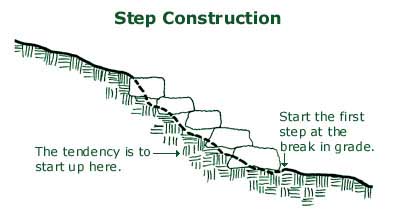
In more primitive settings, you don't need a uniform flight of steps as long as the route is obvious and there is solid tread at each stepping point. In the Sierra, a cross between cobblestones and stairs, locally called riprap, is commonly used for this purpose. Elsewhere, riprap refers to rock forming a loose retaining wall. The most important area of the step is usually in the run. This is where most traffic steps as it climbs. If the step is composed of something like a board on edge with fill behind it, then the traffic will step onto the landing. Almost all foot traffic descending the step will walk off the edge of the step. The top of the step (and landing) should be stable and provide secure footing. The edge of the step should be solid and durable. The face of each step should not contain a batter that creates a "face run" of over 50 mm (2 in) from top to bottom. This is particularly important as the rise of the step increases. If the stairway climbs straight up the hill, each step should be slightly crowned to drain water to the edges or slightly sloped to one side. When the trail traverses a slope, each step and landing should be slightly outsloped. Water should not be allowed to descend long lengths of a set of steps or to collect on or behind a step on the landing. A drain dip where the trail approaches the top of the steps is a good idea. Build stairways from the bottom up, at a break in the grade. The most common mistake is to start part way up a grade. If you do so, the trail will wash out below the stairs (Figure 68). The bottom stair should be constructed on a solid, excavated footing. If it is constructed on top of exposed rock, it should be well pinned to the footing. Each successive stair is placed atop the previous stair. Wood stairs are usually pinned to each other and into the footing. Dry masonry rock stairs usually rely on the contact with the stair below and with the footing to provide stability.
Steps with landings are a bit harder to secure in place because the stairs do not overlap. Each step can either be placed in an excavated footing and the material below the rise removed to form the landing of the next lower step. This is usually the most stable arrangement. Or the step can be secured on the surface and fill used to form a landing behind it. The material used to provide the rise does double duty as a retaining structure when the landing consists of tamped fill. These steps must be seated well to prevent them from being dislodged by traffic. For stock use, landings should be long enough to hold all four of the animal's feet. Individual steps can be placed at any point in a trail. They are useful for retaining tread material in rocky pitches or to protect tree roots. Single steps installed midslope usually become high-step obstacles on stock trails or where there is heavy traffic or erosion. In all steps, the key is to use the largest material possible and to seat it as deeply as possible. Rocks should be massive and rectangular. On steps that traverse a slope, it helps to seat the upper end of the step material in footings excavated into the slope. Maintaining Special StructuresMaintaining climbing turns and switchbacks requires working on the tread, maintaining drainage, and doing any necessary work on retaining walls, guide structures, and barricades. The tread should be insloped or outsloped as necessary, slough should be removed to return the tread to design width, and tread obstacles should be removed. Retaining walls should be carefully checked for shifting, bulges, or loose structural material. Make sure that all the footings are protected from erosion. Guide structures should be secure. Check turn barricades for effectiveness and rebuild as necessary. Remember, these special structures are relatively expensive and deserve careful attention to protect the investment. Some special tactics include the use of:
The best way to learn how to build these structures is to seek someone who designs and builds well thought-out switchbacks, climbing turns, or walls. Have that expert conduct a seminar for your crew or actually participate in the construction. |
|
|
|
|
|
|
Missoula Technology & Development Center |
|
|
|
|
|
|
|
Visitor |
|