
Official websites use .gov
A .gov
website belongs to an official government organization in the
United States.
Secure .gov websites use HTTPS
A lock
(
) or https:// means you've safely
connected to the .gov website. Share sensitive information only
on official, secure websites.


Craft It Yourself! Beads and Clothing
A Bounty of Beads
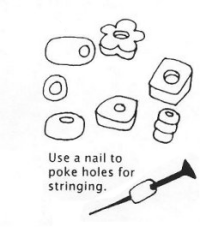 You can make toy "beads" from macaroni, clay, paper, or cut-up drinking straws.
It's also fun to make beads from clay or homemade clay dough. Here's a recipe that dries hard without baking.
- 1 cup flour
- ½ cup salt
- 1 tablespoon oil
- 2 teaspoons cream of tartar
- 1 cup water
- Food coloring
Mix everything together in a large saucepan. Stir constantly with a wooden spoon over medium heat.
It will thicken slowly and then become a big dough ball. Spoon the dough out onto a floured surface, wait for it to cool a bit, and then knead it till it's smooth.
Shape the dough into beads. You can use a nail, a straw, a pencil, chopsticks, or toothpicks to stick holes through the beads so you can string them later.
After you have them shaped and put holes in them, let the beads dry at room temperature until they are hard. You can decorate them later with acrylic paints or permanent markers if you want to.
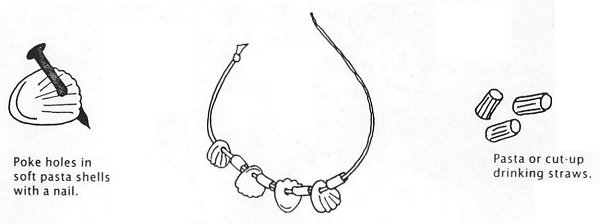
Shell Necklace
- Macaroni
- Embroidery thread or yarn
- Water
- Small bowl
- Food coloring
- Large nail
- Aluminum foil
Fill the bowl halfway with water. If you want colored shells, add a few drops of food coloring to the water to tint it. Drop in a handful of uncooked macaroni shells, and let them soak in the water till they soften enough to poke a nail through. Poke a hole in each shell, and lay the wet shells out on aluminum foil to dry. Make sure the shells don't touch each other or they will be stuck together.
When the shells are completely dry, string them on the thread or yarn. You can put pieces of tube-shaped macaroni between the shells as spacers.
You might want to use other things with your shells, such as pieces of cut-up drinking straws, Styrofoam packing pellets (string them with a threaded darning needle), circles cut out from felt, leather or fake fur, buttons, or plastic bottle caps (poke holes in them with a nail).
Shell Gorget
These pendants were often worn by Indians in the southeastern part of the United States. Others carved shapes from shells and other materials using tools made from bone or stone; the tools had to be harder than the shells in order to carve them. These pendants were worn around the neck.
- Styrofoam plate or saucer
- Scissors
- Tissue (kleenex)
- Toothpick
- Water-based marker
- Ballpoint pen or sharp pencil
- Yarn, 24 inches long
- Clear nail polish (optional)
- White air-dry clay or homemade salt dough (optional, see recipe below)
Cut a round or oval shape out of the styrofoam; it should be 2-5 inches across. Poke two holes through it with a toothpick for threading it later.
Draw a few designs on paper first, so you know what want, then take your pen or pencil and gently press your design into the styrofoam.
To make the design show up better, color over it with a waterbased marker, then gently wipe over it with a tissue (or paper towel or sponge). This will let the colors settle down into the design grooves.
String your pendant onto the yarn, then tie the yarn into a loop big enough to go over your head. You can wear the pendant to bring you luck and skill, as the Indians did.
You can also make a pendant out of clay. Use white air-dry clay or make homemade salt dough.
SIMPLE SALT DOUGH: Mix 4 parts flour with 1 part salt. Stir in just enough warm water to moisten the mixture. Knead this until it is soft and workable. Keep it in a plastic bag, taking out only enough to work with so it won't dry out.
You can use a toothpick to draw designs into the dough and press holes through it for the yarn to go through. When it's dry and hard, you can brush on clear nail polish if you want to, and string the pendant onto yarn. If you have made some beads, you can glue some onto your pendant.
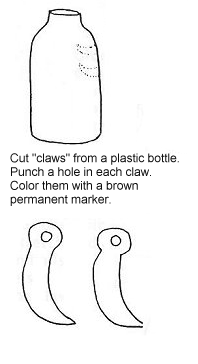
Bear Claw Necklace
A man was very skilled -- and lucky! -- if he survived a fight with a grizzly bear and lived to wear its claws as a necklace!
You can make your own toy bear claws from plastic bottles or homemade clay, and wear them on a necklace.
PLASTIC CLAWS:
- White plastic bottle
- Hole punch
- Brown permanent marker
SALT DOUGH CLAWS:
- 4 cups flour
- 1½ cups water
- 1 cup salt
- Skewer or nail
- Brown paint
- Yarn or cord
- Macaroni
- Drinking straws
- Fake fur or fabric
- Scissors and glue
- Acrylic finish or clear nail polish (optional)
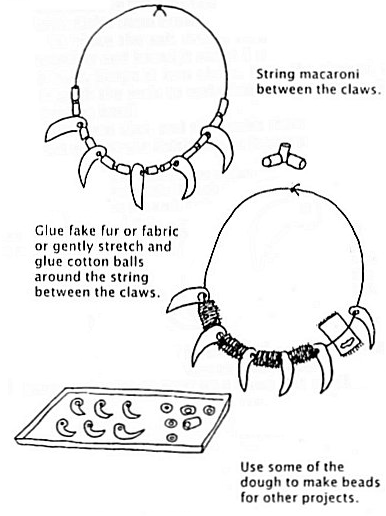 Cut out some claw shapes from the plastic bottle, 2 or 3 inches long, using the curving sides of the bottle to get a curved shape like real claws. Punch holes in the tops. Color them brown, and put black tips on them if you want.
To make salt dough claws, mix the flour, water, and salt together and knead it gently for about 5 minutes until the dough is soft and pliable. Shape it into claws.
Poke the skewer or nail through the large end of each "claw" to make holes for stringing the claws. Bake at 250°F until they are hard.
Let your bear claws cool, and then paint them brown.
To make them shiny, coat them with acrylic finish, acrylic floor wax, or clear nail polish.
(Brown or black shoe polish works, too, but you need to rub them gently with a paper towel so they're polished before you string them.)
String your claws onto a piece of yarn or cord, spacing them apart with 3 pieces of macaroni (or beads or shells or buttons) between each claw.
You can use short pieces cut from drinking straws, too.
Small rectangles of fake fur -- or feathers -- can also be strung between the claws. Cut shapes from the fake fur fabric, fold the pieces in half, and glue them together over the necklace cord.
When you are finished, knot the ends together.
Style note: Different tribes had different hairstyles. Pawnee men, for example, shaved their heads. Crow and Sioux men rubbed bear grease into their hair and grew it as long as they could. Hopi girls wore their hair in twists over their ears until they were married, and after that they wore one long braid in their hair. Most Nez Perce men had attractive hairstyles with long braids (and many still do today).
Headbands

Headbands were worn by many different tribes. Make yours as individual as you are by decorating with geometric or floral designs.
Hair note: In some tribes the men grew very long hair. A Crow chief named Long Hair had hair that measured 10 feet and 7 inches long. He wrapped it around a piece of wood that he carried under his arm. Some tribes even tried to make their hair appear longer by gluing on extra hair, like the "hair extensions" of today.
Here are the materials you will need to make a headband:
- Heavy paper (colored paper, tagboard, or strips of wallpaper)
- Construction paper in various colors
- Markers or crayons
- Scissors
- Stapler or heavy tape
First cut a strip of heavy paper about 2 inches wide and long enough to go around your head -- plus a couple more inches for overlap. Then decorate the headband with your own design. Using wallpaper is fun -- you might get some free sample/size pieces from a home decorating store. After your headband is decorated, cut out some feathers from the construction paper and staple them to the headband. Staple or tape the ends of the band together to fit your head.
War Bonnets
You can make different styles of warbonnets. The Blackfoot bonnet has all the feathers sticking up around the headband. The Apache bonnet is a cap with feathers that droops over the head all around.
Western Plains tribes wore bonnets that went over the back, sometimes reaching the ankles.
Here are the materials you will need for a BLACKFOOT BONNET: 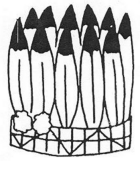
- Tagboard or wallpaper
- White paper
- Cotton balls
- Markers or crayons
- Stapler
- Scissors
- Glue
Cut a strip from the tagboard; make it 3 inches wide and long enough to fit around your head plus 2 more inches for overlap.
Color and decorate the tagboard headband strip with markers or crayons. You should use a combination of zigzags, triangles, and straight lines.
Adjust the headband part to fit your head and staple it, overlapping the ends.
Make a feather shape to use as a pattern. Trace around it to make several feathers. Use a dark brown crayon or marker to draw lines down the center and color the tip of the feather.
Staple or glue the feathers in place around the headband.
Indians used the tiny white plume feathers that grow in an eagle's tail as fluffs for decoration. To make fluffs for your headband, glue a white cotton ball at the base of each paper feather.
APACHE BONNET:
You can also make an Apache-style war bonnet. The Apaches have traditionally lived in the Southwest part of the U.S. and today are found mostly in Arizona and New Mexico.
The most famous Apache was a chief named Geronimo.
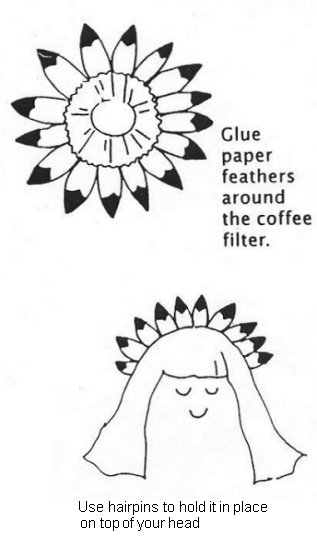 Here are the materials you'll need for this war bonnet:
- White paper
- Large paper coffee filter
- Hairpins ("bobby pins") or small barrettes
- Pencil
- Scissors
- Markers or crayons
- Glue or stapler
Draw and cut out a feather to use as a pattern. Trace and cut out several feathers from white paper. Use a dark brown crayon or marker to color the tip and center of each feather so that they look like eagle feathers.
Glue or staple them in place around the edge of the coffee filter. They should stick out and be floppy. This type of bonnet needs a couple of hairpins to pin it in place toward the back of your head.
You can also make a bonnet in the style worn by the Plains Indians. Here are the materials you will need for a NEZ PERCE BONNET:
- Large brown paper bag
- Tagboard or wallpaper
- Scissors
- Pencil
- Crayons or markers
- Stapler
 Cut the bottom out of the bag so you have a large rectangle of brown paper. Fold it in half lengthwise twice and then cut it in half widthwise as shown. Draw and cut out two feather shapes and a headband in one piece as shown. Be careful, as you are cutting through several layers of paper at once. Do this with both sections of the folded bag. Unfold. Color the feathers with a crayon or marker.
Cut the tagboard or wallpaper into a strip, two inches wide and long enough to fit around your head, plus two more inches. Overlap the ends and staple the headband together so it will fit your head. Staple one strip of feathers to the headband. Cut the other section of feathers in half to make two equal sections. Staple them to the sides of the headband so that they drape down your back.
Some tribes added buffalo horns to their bonnets. You can cut out two curved shapes from colored paper and staple them at the sides if you want to. They should point up.
Tape on an additional feather whenever you accomplish a brave or noble deed!
Bag Vest
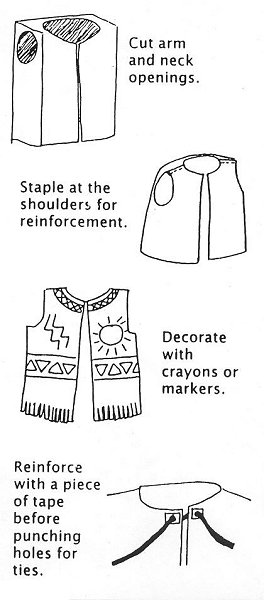
It takes several days and a lot of work to make a buckskin vest, but you can make your own craft vest from the following materials:
- Large brown paper bag
- Scissors
- Paints or colored markers
- Hole punch
- Yarn
- Stapler and tape
- Markers or crayons
Cut the front and neck opening from the bag. Cut out two circles at the sides for arm openings. Pull up the shoulders and staple them securely for extra reinforcement. You may need to trim off some of the bottom of the bag if it is too long.
Decorate the bag with a geometric or floral design; you can also cut a fringe along the bottom edge. Fringes sometimes are decorated with beads or teeth or shells. Fringe not only looks cool, it also has a function -- in the rain the fringe will "draw down" the moisture to the edges of the buckskin. Fringe gets longer as it ages.
To add a tie at the neck, reinforce both of the front neck edges with tape, and then punch two holes in it and thread a piece of yarn through.
Breechcloth
You will need these materials: 
- Cloth, 1 by 4 feet
- Belt
Indians wore breechcloths made of buckskin or other fabric, 12 inches wide and about 6 feet long. They were draped in front and back over a belt at the waist. They were worn by boys and men, and tribes made them in different styles and from various materials. You can make one by wrapping a long piece of fabric (1 foot wide and 4 feet long) through a belt at your waist.
Leggings
You'll need the following materials for some leggings:
- Old pair of jeans
- 2 leather bootlaces or sturdy cord for tying
- Felt
- Scraps of white felt, or plastic bottle (optional)
- Scissors
- Acrylic paint
- Glue
- Hole punch
For a boy's leggings, cut away the front and back of the jeans, leaving the waistband around the front and back and leaving the jeans intact on both sides. Start cutting about 2 inches below the waistband. Leave the legs intact from the upper thighs on down. Leave the belt loops on all the way around. Of course, swim trunks or boxer shorts and a breechcloth will be needed too!
For a girl, cut the leg sections of the jeans off below the knee. Cut slits along the top of the girl's leggings and lace the bootlaces through. They will be tied in place below the knee.
Decorate the leggings with acrylic paints or geometric shapes cut from felt and glued in place. Cut strips of felt or jeans or other fabric into fringe and glue it down the side, too.
Some Indians used concho shells to decorate their leggings and clothing. You can make your conchos by cutting circles from white felt or a white plastic bottle. Punch two holes in the center and lace through the jeans fabric with lengths of yarn or shoelaces. Knot them securely.
Sewing note: Indians traded for sewing thread when the traders arrived. What they used for thread or binding before that -- and what some still use for projects today -- is a material called sinew. Sinew is a long muscle-like material from the legs of an elk or deer. It is stringy and very very strong, and can be pulled apart in thin threads. Thin pieces of sinew, with bone needles, were used to sew tiny bone beads and porcupine quills to clothing for decoration. In the state of Washington, bone needles over 10,000 years old have been found.
Cuffs
Decorated bands were often worn by the Nez Perce and other tribes on the wrists and arms. They weren't very practical for daily work or hunting, but were worn for ceremonies, feasts, and dances -- and they still are today. These cuffs were usually made from buckskin or rawhide and were decorated with beads, shells, and fringe.
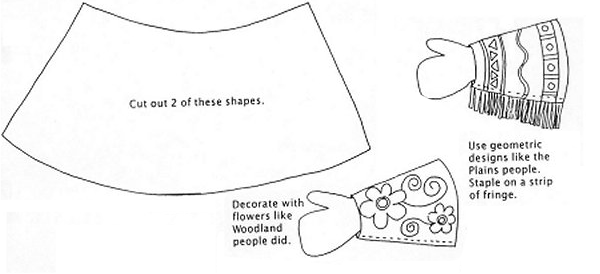
You can make some very cool cuffs with the following materials:
PLAIN CUFFS:
- Vinyl, heavy fabric, or construction paper
- Scissors
- Paint or markers
- Stapler or glue
FANCY CUFFS:
- Suede or velvet fabric
- Scissors
- Needle and thread
- Shells, beads, bells, etc.
Cut out the shape shown from vinyl, fabric, or construction paper. For the plain cuffs, you can decorate it with paint or colored markers. Cut a strip of paper fringe, and staple or glue it in place along one edge of the cuff. Staple the two pieces together at the sides. Slip the cuffs over your hands.
For the fancy cuffs, cut out the illustrated shape from nice suede or velvet (or even corduroy or denim) fabric. Get an adult (maybe your grandma or aunt?) to help you hem the edges of the fabric. Cut another strip for the fringe, and hem one edge of it; fringe the other part with scissors. Sew this carefully onto the other part of the fabric. Sew on shells or beads or bells or other decorations to the wrist cuff and the fringe. If you know someone who is good at sewing, they can show you how to use either elastic for the wristband or clasps or buttons to fasten the cuffs on.
Anklets

Not meant for everyday wear, anklets were worn for dancing -- and they still are worn today at pow-wows and Indian dance competitions. Their graceful sway and bounce adds to and enhances the dancer's movements. Some of the Indians in the Northern Rocky Mountain areas used the long white hair of mountain goats for their anklets. People in other areas used grass, plant fibers, or yarn made from sheep's wool. A wide variety of materials can be used for fluffy and graceful anklets.
You can make some anklets from the following materials:
- White yarn
- 2 shoelaces
- Small bells (optional)
- Scissors
Cut the yarn into 8-inch lengths. You will need a lot of them! Loop and knot them onto the shoelace as shown. Continue adding yard until you have enough to wrap around your ankle; put on more than you think you need to make them really fluffy. Tie the shoelace in a bow at the back or inside of your ankle and arrange the yarn fringe so that it hides the shoelace. As your feet move, the yarns will ripple and bounce. You can also tie on a tinkling bell or two to add a jingle-bell sound.
Fancy Dance Bustle
Dance bustles are used for extra decoration and drama in ceremonial dances. Some big bustles made with lots of feathers look a lot like certain birds during mating dances, like wild turkeys and sage grouse for example, who fluff up their feathers and look very fancy and dramatic while they "dance" during the mating season.
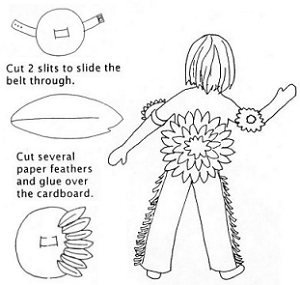
You can make a dance bustle with the following materials:
- Round pizza cardboard (or cardboard cut in a circle)
- Narrow belt or fabric sash
- Construction paper
- Scissors
- Glue
Cut two slits in the cardboard to thread the belt or fabric sash through.
Glue the feathers over the cardboard in a circular pattern, starting at the outer edge and working toward the center. Layer in a row of shorter feathers at the center.
Tie the bustle on so that it fits snugly on your back, and you're ready to dance to the drumming!
You can also make a pair of smaller bustles with small paper plates to tie onto your upper arms like the ceremonial dancers wear.
Make Your Own Breastplate
You can make a breastplate with these materials:
- White tagboard or posterboard
- Yarn
- Stapler
- Colored markers
- Scissors
- Hole punch
Cut two side strips from the tagboard; they should measure 10 inches by 1 inch. Cut 10 more strips that measure 8 inches by ½ inch.
Staple the narrow strips onto the two wide strips along sides, spacing the strips about ½ inch apart.
Punch a hole at the top of the side strips and tie on enough yarn to go around your neck.
Cut two 6-inch pieces of yarn. Punch a hole at the bottom of the side strips, loop the yarn through the hole, and knot it to hang as a tassel.
Use markers to color the center sections of the strips to look like colored beads and bone sections.
You can add real beads or bells or feathers for decoration if you want to.