
Official websites use .gov
A .gov
website belongs to an official government organization in the
United States.
Secure .gov websites use HTTPS
A lock
(
) or https:// means you've safely
connected to the .gov website. Share sensitive information only
on official, secure websites.


Make It Yourself! Toys and Games
The Stick Game
History
The Stick Game has been around before the coming of Christopher Columbus. Documented accounts of Stick Game in the State of Washington go as far back as the early 1800s, where coastal tribes would pack up their canoes full of pelts and other valuables and travel inland to trade with other tribes. History tells us that these tribes did not only trade and barter their wares with the inland tribes, but also they would play Stick Game and bet their pelts and other valuables. In some instances the coastal tribes would lose everything and other times they would return with not only one boat full of goods, but also two or three boats full of valuables that they hand won by playing Stick Game.
Equipment
- Two sets of bone-The set is comprised of two bones that are clear and two bones with a wrap around the center of the bone.
- Sticks-These comprise of 11 Sticks with one stick being the "kick stick" and two other sets of five that have a different design, which total 10. It should be noted that the kick stick has both designs of the five stick on it, that total ten.
- Drums-Most players use these today. In the old days, opposing teams would drum on a lodge pole placed in front of them.
- Singing-The team that wins the kick stick and sings songs that are handed down from generation to generation and differ from tribe to tribe when they are hiding the bones.
- Pointing-This is very simple. You point with your index finger left or right, depending upon where you think the clear bone is. If you point to where the striped bone is, you lose a stick.
Object of the Game
The object of the Stick Game is to obtain all eleven sticks by preventing the other team from guessing where the clear bone is. The team that obtains all eleven sticks is considered the winner.
Who can play?
Any one can play Stick Game.
How to play?
- Teams-The game starts by having two team set up opposite of each other.
- Pointers/Captains-A Captain is designated on both sides, his/her role is to be the lead pointer who will play the other Captain for the kick stick to determine whose Stick Game set they will use and to determine which team hides first. Once it is determined who hides first, that Captain has to lead his/her team in the singing.
- Kick Stick-One Captain will hide the bones in his/her hands (or one of his/her team member's hands) while the other Captain tries to guess which hand the opposing Captain has the clear bone in. If the Captain points to the clear bone, he/she has made the right guess. In the instance that he points to the striped bone he has missed and has to hand over a stick.
- Winning-The game concludes when either team has all eleven sticks in their possession.
Toys
Make Your Own Toy Tipi
You can make a toy tipi, or an entire encampment!
Here are the materials you will need: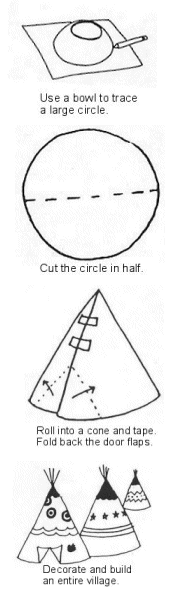
- Bowl or plate
- Scissors
- Construction paper
- Tape or glue
- Markers, crayons, or paint
Draw a large circle on the paper by tracing around the rim of a bowl or plate. Cut the circle out and then cut it in half.
Decorate half the circle with your designs.
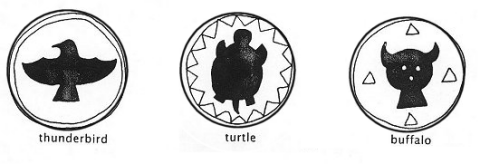
Animal symbols were often used on tipis. Stars and moons and feathers make good designs, too, along with geometric shapes -- triangles are traditional with the Nez Perce.
Roll the paper into a cone shape and tape or glue the ends together.
Cut a slit in the front and fold back the door flaps
You can make clay or paper people to live inside.
New tipis were usually white, but they darkened gradually at the top from smoke. You can use brown crayon to darken the top part of your tipi.
Make several to create a whole spring camp!
What kind of furniture was inside a tipi? Unlike most of our furniture today, the Indians used only lightweight things that could be carried from camp to camp.
Chairs and other furniture items were often made from sticks or bent wood laced up with rawhide or covered with hides or pelts. Some were very beautifully decorated. Beds were often made from soft tree boughs that were piled up thick and soft and then covered with hides or buffalo robes.
Make Your Own Dog Travois
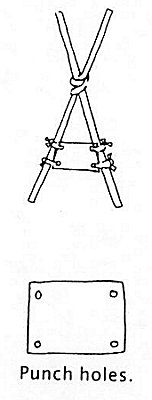 You can make a toy travois -- you'll need a stuffed toy dog (or a real one!), two long dowel rods (twice as long as the dog), some leather bootlaces (or heavy string or twine), some cardboard, and a hole punch. If you do this with a real dog, get an adult to help you.
Tie the dowel rods together with the bootlaces, making an "X" shape as shown. Cut the cardboard (you can use one side of a cardboard box) to fit between the poles, then punch four holes in the cardboard and tie it to the rods. Use bootlaces or a belt or small-diameter soft rope to tie the travois in position across the dog's chest as shown. You can put a little doll or other items on the travois for your dog to pull.
Make Your Own Toy Spear
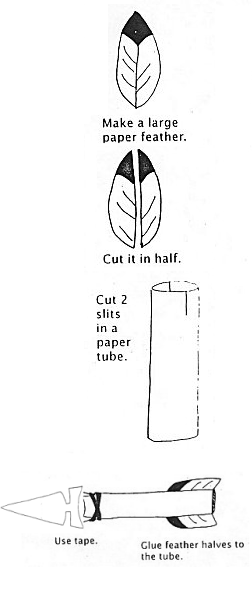 Here are the materials you'll need:
- Cardboard from a cereal box
- Paper towel tube
- Construction paper
- Scissors
- Masking tape or duct tape
- Pencil
- Glue
Cut out a shape for your spear point from the cardboard (see shapes below), then cut two slits across from each other at the end of the tube.
Slide the wide end of the cardboard point between the slits, and wrap tape around it to hold it in place.
Draw a large feather on the construction paper and cut it out.
Cut it into two pieces, right down the center.
Apply glue to the cut edges of the feather and glue the feather halves across from each other at the end of the tube.
Indians in different areas made spear points in different shapes. Use one of these, or make up your own.
You can decorate your toy spear with colored markers, real feathers or fake feathers, and real or fake pieces of fur. You can get some pretty cool feathers and fur stuff and other decorations at a flyfishing store, and a knitting store will have different kinds of yarn for decorations.
Make Your Own Drum
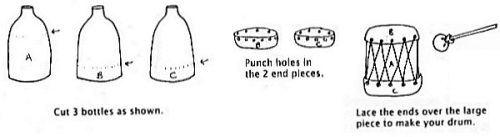 You can make your own toy drum from an oatmeal box, a coffee can, or plastic milk jugs. Here's what you'll need:
- Round oatmeal box with lid, or a clean coffee can with snap-on plastic lid
- Sticks or dowel rods
- Scissors
- Colored markers
- Paper or fabric scraps
- Glue
Cover the box or can with colored construction paper and decorate it with markers -- or glue on some cut-out decorations from paper or fabric scraps.
You can also make a drum from three plastic milk jugs. See below. First, cut away the top of one jug and the bottoms from two others. Punch holes in the bottom pieces about one inch apart. Lace heavy string or yarn through the holes to attach the two sections to the top and bottom of the drum. Decorate with permanent markers.
To make drumsticks, wad up a scrap of cloth for padding over one end of the stick or dowel. Next, wrap another piece of cloth over it and tie it securely with yarn or string. You can decorate these with feathers, paper cut-outs, beads, shells, or pieces of fur or yarn.
Pictograph Painting
You can try some finger painting or you can experiment with spatter painting and the use of sticks or natural pens and brushes.
Here are some of the materials you will need:
- Tempera paints (or watercolors or acrylics)
- Drawing paper or newsprint
- Drinking straw
- Sticks or twigs collected outdoors
- Old shirt or apron
- Newspapers
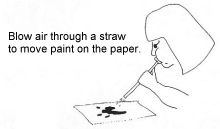 Put on the shirt or apron to protect your clothing. Protect your tabletop or work area from paint splatters with old newspaper or an old sheet (donated from a friendly adult) or a drop cloth. This project is great for outdoors in the summertime -- you can use the ground or a picnic table for a work surface.
Squirt a few very small blobs of paint onto the paper. Then blow air through the straw to splatter the paint. Push the wet paint around on the paper by blowing air on it. Don't suck the wet paint up into the straw.
Experiment with sticks and twigs by dipping them into the paint and then drawing the colors across the paper like you are using a pen or a paintbrush. Make a variety of lines on the paper with a few different twigs to see the difference. Some of them might be pens worth keeping!
You can also take sponges (or large tan erasers from an arts store) and cut them into shapes and use them to "print" the paper with colored paints.
You can use different colors to see what effects you can create.
When your painting is dry, use it as gift wrap or fold it to make note cards. You can also try drawing over it with ink or markers or glueing on bits of torn papers.
A Storytelling Bag
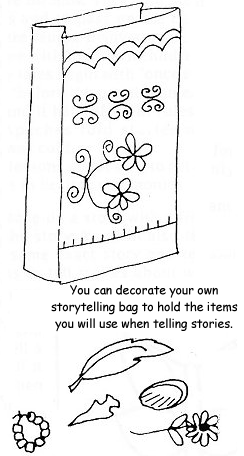
Some storytellers used a special bag full of props or storytelling "helpers."
They would take out a toy or doll and hold it up as they began their story.
You can make one yourself. Decorate a paper lunch bag or grocery sack with crayons or markers. Look for interesting things you can make up stories about, or special "medicine" items, and put them in the bag. Use stones, feathers, fossils, or small toys.
You can make your own little petroglyphs to include in the bag, too.
Practice your stories to go with each item.
Make up a story with a friend by taking turns telling parts of the story. Then try to remember the same story and tell it again the same way the next night. Get your parents or other adults to tell you stories about when they were children or about you when you were very young.
Indian storytellers would keep the audience interested by saying "Hoe?" and the audience would answer "Hey!" Explain this to your audience and try it while you tell your tales. Sometimes storytellers were given a gift when they were finished telling a story. The storyteller would spend the night with the family, and then travel on to the next house in the morning.
Make Your Own Peace Pipe
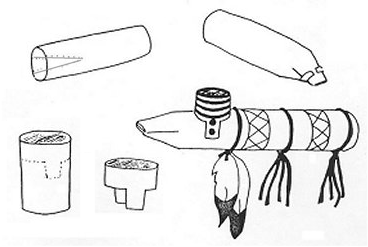
You can make a decorative peace pipe to hang on your wall.
You will need these materials:
- Paper towel tube
- Bathroom tissue tube
- Real or fake feathers
- Yarn
- Markers or crayons
- Beads
- Scissors
- Tape
- Glue
Cut out two triangles across from each other at one end of the longer tube. Make each triangle about 1½ inches long. Press the cut edges together and fasten them with tape to make a mouthpiece. Cut the smaller tube as shown to make a bowl for the pipe.
Glue the bowl to the pipe, and decorate the whole thing with markers or paint. Tie on feathers, yarn tassels, or some beads or shells.
Make Your Own Coup Stick
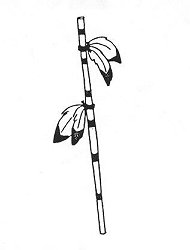
You can make a toy coup stick with the following materials. Whether you touch your enemies with it is up to you
- Stick or dowel rod
- Fake fur, felt, or red cloth scraps
- Feathers
- Yarn
- Glue
- Paint
Create your own style and type of coup stick to hang on your wall. Cut strips from the red cloth and wrap and glue them around the stick, or paint stripes around the stick. Wrap and glue strips of fake fur or colorful felt. Use pieces of yarn to tie on feathers here and there.
Make Your Own Parfleche Bag
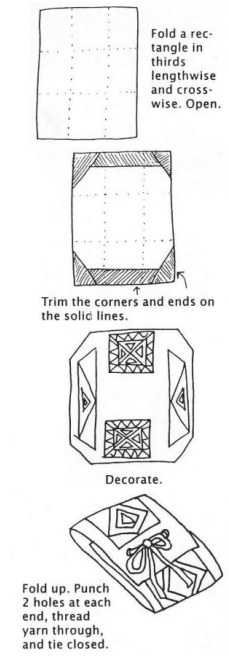
You can make yourself a parfleche bag with these materials:
- Brown paper grocery sack
- 4 pieces of yarn, each 6 inches long
- Scissors
- Crayons or markers
- Hole punch
Cut the paper into a rectangle; you can make it any size you like.
Fold it in thirds lengthwise and crosswise, and then open it back up.
Trim off the corners as shown and decorate with crayons or markers.
Many of the Plains Indians used geometric shapes, such as triangles, diamonds, and lines -- and triangles are traditional with the Nez Perce.
Fold it along the creases.
Punch two holes on each end, thread the yarn through the holes, and tie it closed.
Make Your Own Shield
You can make your own special shield to hang on the wall of your room. You will need these materials:
- 2 paper plates
- Colorful crepe paper streamers
- Colored paper scraps for feathers
- Scissors
- Markers, crayons, or paints
- Stapler
Cut out a strip 2 inches wide from one plate for the handle. If you use the good "Chinet" plates your shield will be better quality.
Decorate the second plate with bright colors in a design that you like -- put the main decoration on the bottom of the plate, because it will be the front of the shield.
Staple the handle to the back of the decorated plate, at the sides.
Staple on a few paper streamers and feathers cut out from colored paper.
You can add yarn tassels, real or fake feathers, strips of fur, ribbons, or other decorations to suit you.
Make Your Own Canoe
You can make your own toy canoe with the following materials: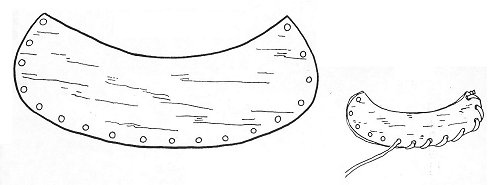
- 2 thin styrofoam trays (from meat or bakery products) or thin cardboard
- Yarn, 2 feet long
- Pencil
- Scissors
- Hole punch or a large nail
Draw canoe shapes onto each of the clean foam trays. Cut them out. Punch holes around the bottom and side edges of both pieces.
Put a little piece of scotch tape around one end of the yard (kind of like the aglet on the end of a shoestring) so that it won't unravel while you push it through the holes.